How to Make a Diamond Block!

Designer: Erin Kroeker
Website: www.theblanketstatement.ca
Instagram: @theblanketstatement
------------------------------------------------------
Skill Level: Beginner
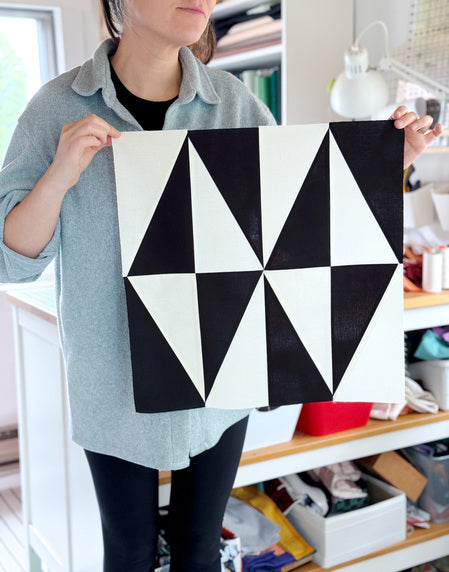
Finished size: 18” x 18”

Growing up my dad was BIG into kites. I’m not talking about a cute, single string, kid’s kite, where you have to run across the park to get it to fly. I’m talking multi-line, extreme sport, traction kite! The ones you see on the beach (sometimes with people surfing) that look as big as a parachute? THOSE kites!
I have never tried his biggest (11m/36ft) kite, but I did try my hand at the much smaller 2m/6.5ft one. It can pull me right off the ground (which it did) and I have managed to get it all twisted and tangled more than once. But needless to say, kiting has been a part of my life.
So, what does this have to do with quilting? The half rectangle triangle block has always reminded me of a kite! But now I AM talking about that classic kite that almost any child would draw if you asked for a picture of a kite.
If we want to get all technical, a kite is a quadrilateral whereas what we’re going to make is a rhombus. But that’s probably not important, this isn’t a math class!

Tools:
OLFA RM-MG-01 24" X 36" Green Double-Sided, Self-Healing Rotary Mat
OLFA 45mm RTY-2/DX Ergonomic Rotary Cutter
OLFA QR-6x24 6" X 24" Frosted Acrylic Ruler
OLFA QR-6x12 6" X 12" Frosted Acrylic Ruler
Fabric & Supplies:
(2) Fat Quarters* – I'm using (A) Black and (B) Natural
Thread
Sewing Machine
Iron and Ironing Board
Pins
*NOTE: You will need additional fabric if using a directional print fabric.
Step 1: Cutting Fabric
From the Fabric A cut:
(4) 5 ½” x 11” rectangles
From the Fabric B cut:
(4) 5 ½” x 11” rectangles

Step 2: Creating the HRTs
Tip - check out this blog post for an in-depth tutorial on how to make and trim HRTs!
The orientation of the diagonal cut when creating HRT blocks is vital. Make sure to double check, especially when using prints!
Create two piles, each with (2) Fabric A and (2) Fabric B rectangles, right side up. The first pile will be for left slant HRTs and the second for right slant HRTs.

Cut all pieces in each pile in half diagonally.
The first pile will be Left Slant, cut diagonally from top left to bottom right.
The second pile will be Right Slant, cut diagonally from top right to bottom left.

Rearrange cut triangles into their HRT pairings.

Place triangles RST (right sides together) and offset the seam by ¼". Sew along the diagonal edge. Press the seams open or to the dark side based on your preference.

Repeat for all HRT pairings. Trim all HRTs to 5 ½" x 9 ½".

Step 3: Assembling the Block
Arrange your HRTs into the final block arrangement. I alternated Light and Dark for all blocks, but feel free to get creative!

First sew the HRT pairings together using a ¼" seam allowance. Press seams.


Sew units into diamonds. Take your time to carefully pin and match the seams to line up your points. Press seams.


Sew diamond units together. Press seam and give the whole block a good press!


Measure your completed block and if necessary, trim to 18.5” x 18.5”, ensuring all sides are straight and corners are square!

Way to go, you did it!
Did you know this block is actually part of a series? This is the third 18” quilt block – each rooted in traditional quilting but with a modern flair. Check out the tutorials for the Bear Paw Block and Sawtooth Star Block!
Stay tuned because after we make a few more blocks, I’ll show you how to bring them all together in a unique, sampler-style quilt!


