Curvetastic 10 Month OLFA Circle Cutter Quilt Along - Month 3

Designer: Amanda Brown
Instagram: @myfabricheart
-------------------------------------
Check out the rest of this series, HERE!
Welcome to Month 3 of our Curvetastic Quilt Along! For the next six months we will be making one of the feature blocks for our quilt. One block a month gives you plenty of time to work on your background blocks from Month 2.
This month we are making a Drunkard’s Path variation. This features quarter circle curves like Month 2 with one key difference, they are smaller. I personally find piecing tighter curves a bit more challenging. The 16 you make for this block will really help you hone your accuracy. You will be squaring up your pieced curves to help make sure they look great!
Through out this Quilt Along remember you can always check back to Month 2 which includes a ton of information on terminology, how to use your OLFA Circle Rotary Cutter and how to sew your curves together.
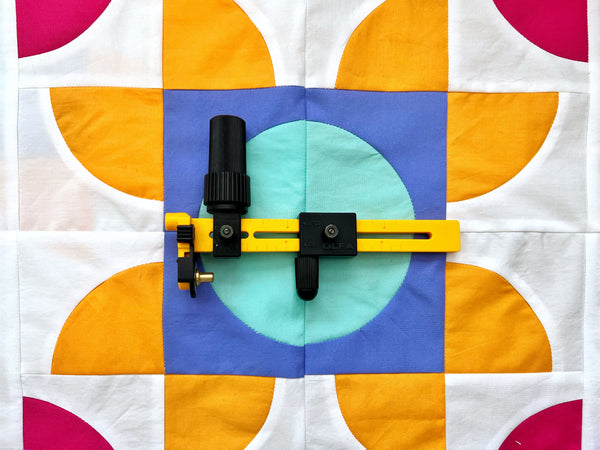
The following instructions are for the block you see above. Feel free to make it your own by changing up fabrics and how each 1/4 circle appears in the block. You will have to adjust the cutting amounts below so you have a total of 16 outside curves (4”x4” pieces) and 16 inside curves (3.5”x 3.5” pieces) cut.
If you are struggling with accuracy on pieced curves I suggest choosing a layout where you aren’t matching up units to make a 1/2, 3/4 or full circle. There are endless combinations for this, like the one below. Then the inaccuracy becomes a new design element and a one of a kind block. Look at you being all fancy!
*** If you are appliquéing this quilt please skip to the Appliqué section for your instructions
Pieced Block Instructions
Cutting:
Use scraps for White Background if you have them.
- (12) 4” x 4” White (Background )
- (4) 4” x 4” Purple
- (3) 3.5” x 3.5” Pink
- (3) 5” x 3.5” Blue
- (8) 5” x 3.5” Orange
- (4) 1.5” x 6.5” White (Background)
- (4) 1.5” x 7.5 White (Background)

New Pivot Point Template:
On another corner of your Pivot Template from Month 2 mark out and cut out a 1/4” square
Curve Cutting:
- Using your new Pivot Template, mark one corner of each 4” x 4” White Background and Purple squares.
- Set your OLFA Circle Rotary Cutter to 2 1/4” and cut out a 1/4 circle. Keep the Outside Curve.
- Using your Pivot Template mark one corner on each 5” x 3.5”.
- Set your OLFA Circle Rotary Cutter to 2 3/4” and cut out a 1/4 circle. Keep the Inside Curve.

Piecing (1/4” seam allowances):
-
Piece the White Background Outside Curves with an Inside Curve from the Pink, and Orange Fabrics and press seams to the outside of block.
- Piece each of the Purple Outside Curves with a Blue Inside Curve and press seams to the outside of block.
-
Trim each of these units to 3.5” x 3.5” lining up the 2 5/8” mark along the dividing line between the inside and outside curve. See the video below for clarification. Taking the time to trim accurately allows your curves to match up perfectly.
-
Create 4 units following the diagram below.
-
Attach one 5” x 7.25” White Background to one outside edge of each of the 4 blocks. Press seam allowances to the outside.
-
Attach 5” x 8.25” White Background to the other outside edge of each of the 4 blocks. Press seam allowances to the outside.
-
Sew 4 blocks together. Your block should measure 14.5”x14.5”
Applique Instructions
Use scraps for White Background if you have them.
- (12) 3.5” x 3.5” White (Background )
- (4) 3.5” x 3.5” Purple
- (3) 3” x 3" Pink
- (3) 3” x 3" Blue
- (8) 3” x 3" Orange
- (4) 1.5” x 6.5” White (Background)
- (4) 1.5” x 7.5” White (Background)
New Pivot Point Template:
On another corner of your Pivot Template from Month 2 mark out and cut out a 1/4” square
Curve Cutting:
- Using your Pivot Template mark one corner on each 3” x 3” square.
-
Set your OLFA Circle Rotary Cutter to 2 1/4” and cut out a 1/4 circle. Keep the Inside Curve. Repeat for all 3” x 3” pieces.
Piecing:
- Line up the straight edges of one inside curve with one corner of a background squares. Pin, glue or use fusible web to secure these together if needed.
- Using your favorite appliqué stitch sew the curved edge to the background square. If your fabrics are bunching you may want to add a tear away stabilizer to the back of your background squares.

4. Sew 4 blocks together. Your block should measure 14.5”x14.5”
Continue on to Month 4, HERE!


