Zippered and Scrappy Pencil Case

Designer: Daisi Toegel
Instagram: @daisitoegel
Website: www.flowersew.com
Shop: www.etsy.com/shop/daisiflowersew
---------------------------------

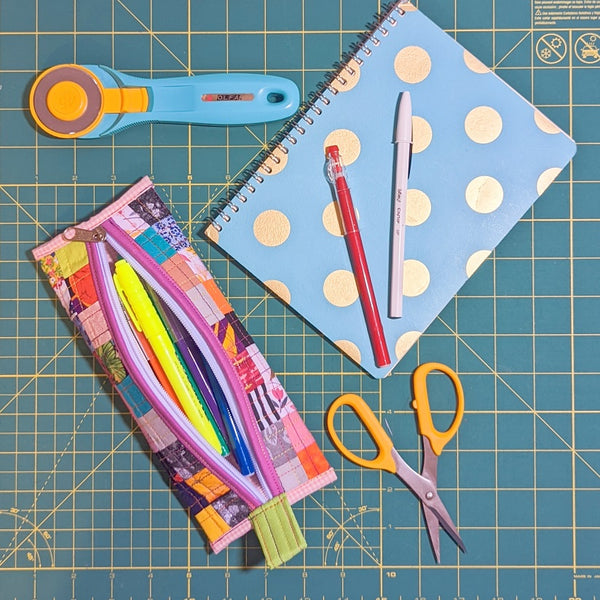
After learning more about how I sort and organize scrap fabrics on my two previous posts here (How to organize and store fabric scraps and Small, Medium and Large Scrap Pieces – How to cut them to maximize use), it’s time to get creative and use your scrap fabrics. In this tutorial you will learn how to make a zippered pencil case using only scrap fabric pieces. Get creative using any size of small scraps you have, make it as colorful or color coordinated as you want, or use larger pieces of scrap to make it from one whole piece of fabric as well. It’s back-to-school season, so it’s a great project for your little ones or for yourself as this case fits 2 OLFA Rotary Cutters perfectly.
Let’s get started.

Tools needed:
- OLFA RM-SG 18”x24” Green Double-Sided, Self-healing Rotary Mat
- OLFA 45mm RTY-2/C Quick-Change Rotary Cutter, Aqua
- OLFA 45mm RB45H-1 Tungsten Steel Endurance Rotary Blade, 1pk
- OLFA QR-1x12 1" X 12" Frosted Acrylic Ruler
- OLFA QR-4S 4 1/2" Square Frosted Acrylic Ruler
- OLFA QR-6S 6 1/2" Square Frosted Acrylic Ruler

Fabrics, zipper and stabilizer/batting requirements:
- (1) 9”x7” stabilizer, or quilt batting, or flex foam/Soft and Stable
- (1) 9”x7” main fabric or patchwork top (choose any piecing, foundation paper piecing, English paper piecing, etc.)
- (1) 9”x7” lining fabric
- (1) 12” or longer zipper + (1) zipper pull if using zipper by the yard (I am using zipper by the yard because it’s detachable which makes it easier to sew each size separately)
- (2) 5”x2” outer sides binding fabric
- (2) 10”x2” zipper binding
- (1) 4”x4” for tab + (1) 1”x3” stabilizer, or quilt batting, or flex foam/Soft and Stable

TIP:
For binding, use those binding left over pieces to give the project an extra scrappy look. Play with colors and sizes available.

1) Sewing the scrappy top:
For my project patchwork top, I used the QR-4S 4 1/2” Square Frosted Acrylic Ruler to cut (63) 1 1/2" square pieces, and I sewed a 9x7 grid and the final top was 9 1/2"x7 1/2". I simply basted it on the stabilizer (I used ThermOweb Non-woven Craft Sew-in Firm), quilted and trimmed it to the stabilizer size 9”x7”.

2) Preparing the project body:
Create your top as desired and quilt it on the stabilizer with or without the lining basted on the back.
Very often I create my bag projects mostly quilting the top and stabilizer first, then adding the lining fabric, and sewing 1/8” seam allowance all around to secure it. It’s my personal choice to always have a non-quilted lining.
After your 9”x7” piece is completely quilted and with your lining fabric sewn, bind both long edges and trim any excess binding fabric.


3) Sew the zipper:
Before we forget, fold the project in half meeting the zipper sides and make a little cut on the sides without the zipper to mark the horizontal center. This mark will be used in step 5.
To sew the zipper, detach the sides and sew each side separately as pictured. Make sure the zipper teeth is facing up on both sides, and the length remaining on each side is the same to make it easier to re-insert the pull. If using pre-cut zipper I recommend 16” or longer to make it easier to maneuver the project. Open the zipper completely in order to sew each side. Don’t trim the excess zipper just yet (will be done in step 5). In this step use the zipper foot on your sewing machine.


4) Make the tab:
Fold the 4”x4” square in half and press. Open and fold each side to the center. Insert the stabilizer piece 1”x3” and fold the sides closed. Press and sew straight lines 1/4” apart. Trim any excess thread.

5) Finishing the pencil case:
With the project main side facing out, close the zipper stopping the pull 2” before the edge. Pin the tips closed and trim any excess zipper.
Align the zipper to the marks made on step 3 and sew both sides with an 1/8” seam allowance to secure the sides closed. After sewing, center the tab folded in half on the side where the zipper opens, and sew an 1/8” seam allowance to secure it in place (the tab will lay on top of the zipper).

Bind both sides, pull the tab back, and sew it on the binding, this way it doesn’t lay on top of the zipper, and you’re all done!!!!

Considerations:
Depending on what stabilizer, batting or foam you choose and the sewing machine you have, this project can get a bit thick to sew through the layers. I totally recommend quilt batting to make this project, it’s a great opportunity to use batting scraps, it doesn’t get bulky to sew and it gives nice stability since it’s a small size project.

Hope you get inspired to create many pencil cases using different scrap fabrics, piecing techniques and fun colors. Stay tuned for my next post we’ll use our medium fabric pieces to make another back-to-school themed project!