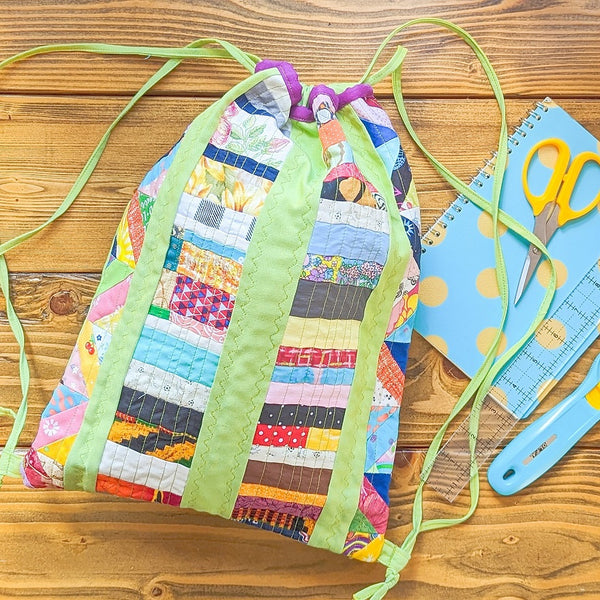
Scrappy Drawstring Bag

Designer: Daisi Toegel
Instagram: @daisitoegel
Website: www.flowersew.com
Shop: www.etsy.com/shop/daisiflowersew
Size or dimensions: Medium: 15” x 11”/Large: 17” x 14”
Skill level: Confident Beginner
---------------------------------------------------

After making a project with small pieces of scrap fabric (Check out Daisi's previous project, HERE), it’s time to get creative and use a diverse of sizes and colors to create another project with your scrap fabrics, so let’s make a drawstring backpack!!
In this tutorial you will learn how to make a MEDIUM size and fully lined drawstring backpack without using any batting or stabilizer. This bag is finished with French seams for an easy sew. The medium size is recommended for kids 4-12yo. This tutorial also has cutting information for a large size, suitable for +12yo. To help you get creative and use your scrap fabric stash, I am adding a FREE foundation paper piecing block sheet to this tutorial, Download HERE!
The patchwork in this tutorial is optional, you can create any patchwork block, add sashing or make a whole cloth bag.
Let’s get started.

Tools needed:
- OLFA RM-SG 18”x24” Green Double-Sided, Self-healing Rotary Mat
- OLFA 45mm RTY-2/C Quick-Change Rotary Cutter, Aqua
- OLFA 45mm RB45H-1 Tungsten Steel Endurance Rotary Blade, 1pk
- OLFA QR-1x12 1" X 12" Frosted Acrylic Ruler
- OLFA QR-6x24 6" X 24" Frosted Acrylic Ruler
Fabric requirements:
MEDIUM SIZE:
- (2) 16 1/2"x13” – (1) for FRONT (main fabric/patchwork block) and (1) for backing
- (2) 16 1/2”x13” lining fabric
- (2) 55” x 1” cord
- (2) 13” x 3” cord tab (TOP)
- (2) 3” x 2” cord tab (BOTTOM)
- (2) 13”x 2” top binding
LARGE SIZE:
- (2) 18 1/2"x16” – (1) for FRONT (main fabric/patchwork block) and (1) for backing
- (2) 18 1/2”x16” lining fabric
- (2) 72” x 1” cord
- (2) 16” x 3” cord tab (TOP)
- (2) 3” x 2” cord tab (BOTTOM)
- (2) 16”x 2” top binding

1) Prepare cords and tabs:
When sewing bags, it’s better to have all parts made such as tabs and cords made in the beginning, this way the project flows well and surprisingly quickly as you go.
To make the TOP cord tab, fold each one in half on the longer edge and press. Open and fold the shorter edges twice towards the center, press and topstitch. For the bottom tabs, fold each one in half on the longer edge and press. Open and fold both longer sides towards the center and topstitch on both sides.
Tip: a tailor’s clapper always helps me to press and hold the pieces folded flat as I sew other pieces, so when I get my next it’s nicely creased!

To make the cords, either press it as you go folding both longer sides towards the center or use a bias tape maker.
Topstitch and set it aside.

2) Preparing the project body:
Create your top as desired. In this tutorial I will show you how I created my version.
I used fabric tape, which is when you sew scrap fabric strips on receipt paper, for more details click on this previous post here (Small, Medium and Large Scrap Pieces – How to cut them to maximize use).
I cut (2) 16 1/2" long strips to add to my project. I also used 16 mini blocks from the foundation paper piecing block sheet provided. Each of these blocks finishes in 2 inches, I used 8 blocks on each side of my block. The unfinished size is 16 1/2"x13 and it’ll be used as a main side of the bag, on the front.

Besides the scrappy patchwork mentioned, I used sashing to divide these blocks. Between each block I used (1) 16 1/2”x2” on the center (finishing in 16 1/2”x1 1/2" wide), and (2) 16 1/2"x1 1/2" (each finishing in 16 1/2”x1" wide), on each side between the fabric table strip and the foundation paper piecing block strip.
The sashing was used to extend the width of the block in order to achieve a 13” wide block for the medium bag.

3) Quilting the bag:
After the main side is done (or patchwork), press all bag parts (front, back and lining fabrics). Note that I used the same fabric (and color) for my lining and backing.
To quilt, with wrong sides together, lay (1) lining with the front fabric and (1) lining with the backing fabric. Quilt each part separately as desired. I used a decorative wavy stitch on my sewing machine.
Trim each piece to:
- MEDIUM bag: 15” x 12 1/2"
- LARGE bag: 17” x 15”

4) Sew the top tab and binding:
With both sides of the bag trimmed, mark the top of each on the center. Do the same to the binding and top cord tab.
With the lining side up on each side, lay the top cord tab first, aligning to the center preciously marked and with opening facing the edge. Lay the binding on top of the cord tab and align the center.
Sew using a 1/4” seam allowance to hold all three fabrics together. Fold the binding back and topstitch leaving the cord tab loose, so the cord can freely move in it when inserted.


5) Sew the bottom tab:
On the front part mark 1/2” from the bottom up on both sides. Sew the bottom tabs on each side above the mark to secure it in place.

6) Finish the bag with French seams:
Lay both sides of the bag with the lining right sides together and main sides facing out for both sides, and sew a U shape, avoiding the top, using 1/4" seam allowance all around.

Clip the two bottom corners before the seam diagonally, and turn the bag inside out.
Sew a U shape, avoiding the top, using a 1/2” seam allowance this time. Turn the bag inside out and it’s ready to insert the cords.

7) Finish the bag:
Insert the cords. One cord goes from one bottom tab up and all around the top through both sides finishing on the same side where it was inserted and tied up with its first end.
The second cord goes through the same process but on the opposite side.

Once the cords are all tied and in place, bring the bag to the sewing machine and on each bottom tab, sew close but not on top of the cord to lock the space where the cord can slide through but not let the knot slip through.

You’re all done!!!

Hope you get inspired to create using different scrap fabrics and blocks, piecing techniques and fun colors.