Comment créer des invitations à l'obtention d'un diplôme faciles et élégantes

Créateur : Marcia Izabel Marchiori
YouTube : MarciaBel Vlog
Instagram: @marciabel
---------------------------------------
Niveau : Débutant
L'obtention d'un diplôme est une belle étape, remplie de fierté, de réflexion et d'espoir pour l'avenir. Cela mérite d’être célébré avec amour et style.

Une façon simple de rendre l'occasion encore plus spéciale est de planifier une réunion significative avec vos amis et votre famille, et créer vos propres invitations est une belle façon de donner le ton dès le début. Un moyen simple de rendre l’occasion encore plus spéciale est de créer vos propres invitations !

Dans ce tutoriel, je’Je vais vous montrer comment créer des invitations à l'obtention d'un diplôme à la fois élégantes et faciles à créer. Tu as gagné’Je n’ai pas besoin d’outils compliqués ni d’expérience en conception. Je’m en utilisant les couleurs classiques de graduation, noir et jaune or, mais vous pouvez facilement personnaliser le vôtre avec les couleurs qui correspondent au diplômé’s profession ou style personnel. Avec seulement quelques fournitures de base, vous pouvez créer des invitations réfléchies, personnelles et raffinées.

Que vous organisiez une réunion formelle ou une simple célébration, ces invitations DIY ajouteront une jolie touche artisanale que vos invités apprécieront.
Outils et fournitures nécessaires
• OLFA fTapis de découpe pliable CM-12x17 12" x 17"
• OLFA Appliqué de précision SCS-4 de 5 pouces Ciseaux
• OLFA Couteau d’art graphique Designer AK-5
• OLFA Règle en acrylique givré QR-6x12 6" x 12"
• Papier cartonné noir, format lettre (ou n'importe quelle couleur de votre choix)
• Papier cartonné blanc, format lettre, adapté à l'impression
• Fil à broder (n'importe quelle couleur que vous aimez, utilisé ici : Aurifil 2134 Spun Gold)
• Épingles fendues rondes coordonnées pour correspondre à la couleur du fil (utilisée : jaune ou or)
• Ruban adhésif double face 11/4"
• Colle blanche
• Enveloppe
• Imprimante
Jeinstructions
1. Imprimez le modèle de fond à l'échelle. Je l'ai imprimé directement sur du papier cartonné noir mais, si les lignes sont trop difficiles à voir, imprimez-le d'abord sur du papier blanc, puis placez-le sur le papier cartonné noir et utilisez-le comme guide.

2. Utilisez le couteau artistique et la règle OLFA pour découper soigneusement le fond noir en suivant le modèle.

3. Utilisez la règle comme guide et la base effilée du manche du couteau d'art OLFA pour marquer délicatement deux lignes de pliage sur la carte noire.
4. Pliez et mettez la carte de côté une fois terminé.

5. Ouvrez le fichier PDF modifiable ici et mettez-le à jour avec les informations de votre événement. Imprimez ensuite le fichier sur du papier cartonné blanc.
6. Utilisez le couteau artistique et la règle OLFA pour découper chaque carte imprimée à la bonne taille.

Ajout de bordures dorées à la carte imprimée :
7. Ajoutez du ruban adhésif double face sur les bords supérieur et inférieur du blanc carte. Laissez le ruban dépasser légèrement les bords du papier. Alors, tuse OLFA appliqué ciseaux pour couper le ruban exactement jusqu'au bord.


8. Placez soigneusement une feuille d'or sur le ruban adhésif sur les bords supérieur et inférieur. Frottez-le avec votre doigt ou un outil jusqu'à ce que le papier d'aluminium colle.


9. Répétez ce processus pour les côtés gauche et droit, en alignant toujours soigneusement le ruban avec les bords.


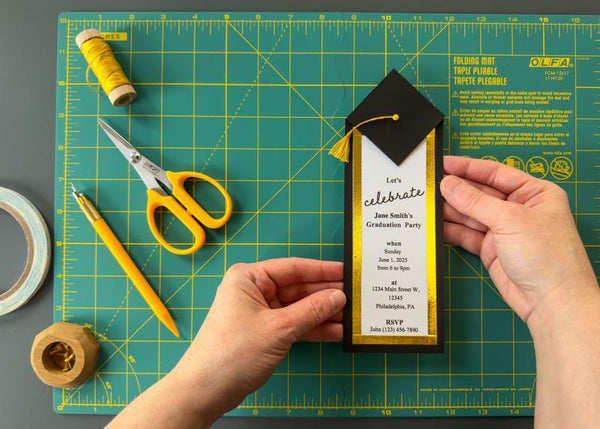
10. Utilisez du ruban adhésif double face pour fixer la carte blanche finie au centre du fond noir.

Pour réaliser le pompon :
11. Coupez quatre morceaux de fil à broder, chacun mesurant 2 pouces de long.
12. Coupez un morceau de fil de 4 pouces.

13. Utilisez le morceau de 4 pouces pour faire un nœud autour du milieu des trois morceaux courts ensemble.

14. Brossez doucement le haut du pompon à l'aide d'un outil ou de vos mains pour aider à le façonner.

15. Ajoutez un petit point de colle blanche pour coller les deux extrémités du fil suspendues ensemble pour ressembler à un cordon. Laissez sécher.

16. Coupez tout fil supplémentaire pour nettoyer le pompon.

17. Utilisez la pointe de l'aiguille du couteau d'art OLFA pour faire une petite piqûre au milieu du carré de carte noire où ira le pompon.

18. Insérez le pompon dans le trou en le fixant avec une épingle ronde fendue.

19. Au dos de la carte, utilisez du ruban adhésif double face pour maintenir le fil supplémentaire et cacher la goupille fendue.

Votre invitation est maintenant prête ! Il a un look fait main et élégant qui rendra votre célébration encore plus spéciale.


Je’j'adorerais voir ton travail fini! Taguez-moi @marciabel et @OLFA_craft afin que nous puissions admirer vos belles invitations.
Marcia