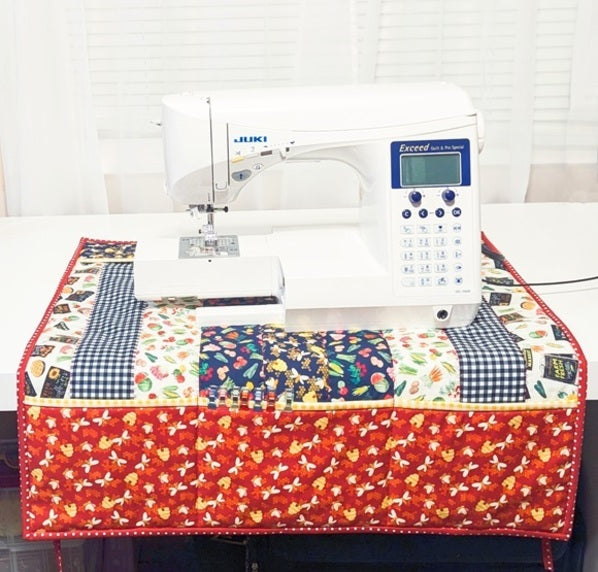
Sewing Machine Mat and Dust Cover

Designer: Daisi Toegel
Instagram: @daisitoegel
Website: www.flowersew.com
------------------------------------------------
Project name: Sewing machine mat and dust cover
Category: Sewing organization
Size: 27in square
Skill level: Confident Beginner
Pattern notes:
- Seam allowance is ¼in unless noted otherwise.

Tools:
OLFA 45mm RTY-2/C Quick-Change Rotary Cutter, Aqua
OLFA RM-SG-01 18" x 24" Green Double-Sided, Self-Healing Rotary Mat
OLFA QR-6x24 6" x 24" Frosted Acrylic Ruler
Fabric Requirements:
Color 1 (c1) = Blender black gingham |
(1) 28in x 28in +(2) 28in x 3 1/2in |
backing fabricTop strip patchwork |
Color 2 (c2) = Veggies cream |
(2) 28in x 3 1/2in |
Top strip patchwork |
Color 3 (c3) = Veggies navy |
(2) 28in x 3 1/2in |
Top strip patchwork |
Color 4 (c4) = Signs |
(2) 28in x 3 1/2in |
Top strip patchwork |
Color 5 (c5) = Bees navy |
(1) 28in x 3 1/2in +(1) 4in x 27in |
Top strip patchworkShort pocket front |
Color 6 (c6) = Bees red |
(1) 7in x 27in |
Tall pocket front |
Color 7 (c7) = Blender red dots |
(1) 1 1/2in x WOF, sub-cut (4) 10 1/2in x 1 1/2in(4) 2 2/1in x WOF(1) 7in x 27in(for WOF strips assume 42in) |
TiesOverall bindingTall pocket lining |
Color 8 (c8) = Yellow Gingham |
(2) 2 1/2in x WOF(1) 4in x 27in |
Pockets’ edges bindingShort pocket lining |
You’ll also need:
*(1) 28in x 28in stabilizer or batting (base)
*(1) 7in x 27in stabilizer or batting (tall pocket)
*(1) 4in x 27in stabilizer or batting (short pocket)
Tools needed:
RM-SG 18”x24” Green Double-Sided, Self-healing Rotary Mat
45mm RTY-2/C Quick-Change Rotary Cutter
QR-6x24 6”x24” Frosted Acrylic Ruler

Prepare the ties:
Press each long side of the 1 1/2in x 10 1/2in fabric pieces of C7 towards the center by 1/4”. Fold both long ends together and sew to finish the edges.

Prepare the binding pieces:
Press each long side of the pocket binding strips with right side out, also sew the overall binding strips together on the 45-degree angle, and press in the same manner of the pocket binding strips. Set them aside for now.

Prepare the pockets:
Fuse or pin the pocket pieces to be quilted (quilt sandwich) according to their respective measurements – lining fabric + batting + front fabric – if you prefer not to quilt, sew around all for sides to hold all layers together.
Bind one of the long sides according to the front fabric print direction (if applicable).

Make the base:
The main side of the base is formed by a strip patchwork. In the order of your preference, sew all (9) 28in x 3 1/2in strips together on the long edges. Press seams either to the side or open.
Baste the patchwork piece on the batting and also the backing fabric.

Quilt using the method of your preference and trim to 27in square. Sew along all edges using a 1/8in seam allowance to make the process of adding the pockets easier on the edges.

Sew the pockets:
With the strips vertically oriented (and the project’s main side facing up), align the tall pocket on one of the bottom or top edges of the quilted base.
Make sure the raw edges are aligned and the pocket top is facing the correct direction. Pin the pocket in place and also secure the sides with clips or pins.
Sew along the raw edges first, and then following the distance of 3 strips from each side, sew two separate divisions on the pocket (backstitch a couple of times at the pocket binding to secure the seam). Please see photo below for a better understanding of this step.

Turn the project to the opposite edge, and repeat the same process to sew the short pocket.

Sew the ties and finish with the overall binding:
Turn the project to the lining side now facing up and align each tie strip 7in above the bottom and top edge on each side. Pin and clip each one in place and sew on the edge using 1/8in seam allowance to secure.
Keep the clips and pins in place to sew the overall binding.

Sew the binding using the method of your preference, and carefully follow with your hand the spots where the tie strips are to make sure the binding sews smoothly over them.

Use this project as a sewing machine mat and also as a sewing machine dust cover!!!


