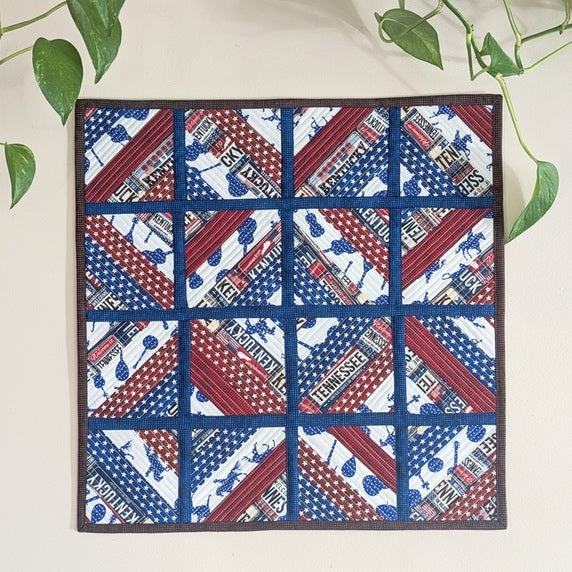
Kentucky/Tennesse - Scrappy stripes quilt-as-you-go mini quilt

Designer: Daisi Toegel
Instagram: @daisitoegel
Website: www.flowersew.com
------------------------------------------------
Category: Patchwork
Size: 18” square
Skill level: Confident Beginner
Pattern notes:
- Seam allowance is ¼in unless noted otherwise.
- FE = fat eighth 9” x 21” (WOF = 21”)
Fabric Requirements:
Color 1 (c1) = Music |
1 FE |
Color 2 (c2) = Horses |
1 FE |
Color 3 (c3) = Red Stars |
1 FE |
Color 4 (c4) = Blue Stars |
1 FE |
Color 5 (c5) = Plates KY |
1 FE |
Color 6 (c6) = Plates TN |
1 FE |
Color 7 (c7) = Blender Red |
1 FE |
Color 8 (c8) = Blender Blue |
1 FE |
Color 9 (c9) = Blender Brown |
1/2 yd |

Cutting instructions:
Color 1 through 7: Cut (4) 1 1/2” x WOF strips; (no sub cutting necessary, as you’ll trim each strip as you go)
Color 8: Cut (6) 1” x WOF; sub cut (12) 4 1/2” x 1” and (3) 18” x 1”;
Color 9: Cut (3) 1” x WOF; sub cut (12) 4 1/2” x 1” and (3) 18” x 1”;
Cut (2) 5” x WOF; sub cut (16) 5” x 5” squares;
Cut (2) 2 1/2" x WOF and join in the 45-degree angle, press lengthwise with wrong sides together and set aside.
You’ll also need:
(16) 5” x 5” squares of quilt batting;

Tools needed:
RM-SG 18”x24” Green Double-Sided, Self-healing Rotary Mat
RM-12S; RM-12S-01 12" Rotating, Self-Healing Cutting Mat
45mm RTY-2/C Quick-Change Rotary Cutter
QR-6x24 6”x24” Frosted Acrylic Ruler
QR-6S 6 1/2" Square Frosted Acrylic Ruler
QR-4S 4 1/2" Square Frosted Acrylic Ruler
Sew the blocks:
For each individual block, press (1) backing fabric square (5” X 5”) with right side out on one side of a 5” x5” square of batting to start making the block sandwich.
To make the blocks, start by aligning one strip of any fabric from C1 through C7 facing up diagonally on the batting side of the block’s sandwich. Don’t trim the fabric strip yet.

Lay another strip of a different fabric right sides together with the first strip, and trim both strips together a little longer than the block’s end tip.
Sew using 1/4” seam allowance.

Open the sewn strips and finger press. Quilt them in place using your favorite design.

In one of the strips sides, add another different strip right sides together, trim the strip a little longer than the area to be covered and sew.
Open, finger press, quilt and keep adding strips on each side until the entire batting is covered.
Repeat this process to make (16) blocks.
You can use this technique for any block size or strip width to make individual blocks.

Use the QR-4S 4 1/2" Square Frosted Acrylic Ruler to trim the blocks to 4 1/2" square, and to make this process easier, use the RM-12S; RM-12S-01 12" Rotating, Self-Healing Cutting Mat.

When all blocks are done and trimmed, plan a layout of your preference.

Following the planned layout, on the joining side of each block, sew a 4 1/2" x 1” C8 fabric strip on the front, and a C9 fabric strip on the back. This is the quilt-as-you-go strip joining method to unite the blocks. Clip them right sides together with each front and back of the block and sew the 3 layers together.

Fold the front strip 1/4" in towards the block edge. Press the back strip forward, away from the block.

Working in rows, add the next block from the planned layout with its backing side right sides together the backing strip sewn on the previous block. Sew using 1/4in seam allowance.

With the project’s main side facing up, align the top strip (with the edge previously folded in by 1/4”), on top of the raw seams so it covers them on the front as well. Topstitch it in place.
Tip: use top and bottom thread colors to match the fabric colors of the strips to blend accordingly.

Repeat the technique on every joining side of each row, and then when joining the rows together, horizontally (using the 18” x 1” strips).
You can use this same joining technique on any quilt-as-you-go project keeping the same strip width (1”), if sewing using 1/4in seam allowance, and only adjust the length according to the blocks sizes.

Bind using the method of your preference and you’re all done.


