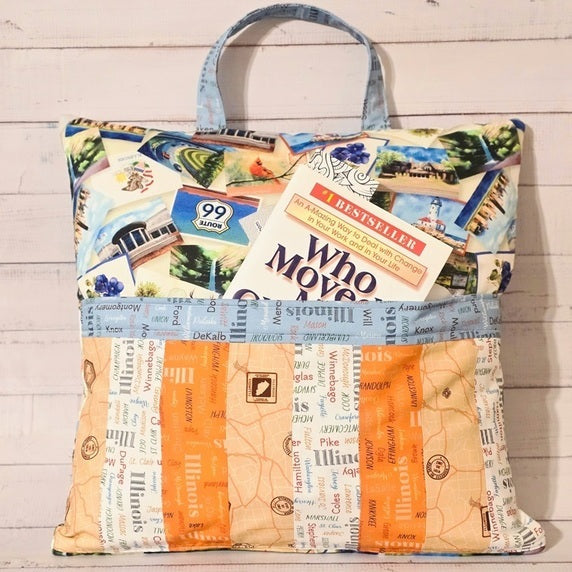
Illinois Reading Pillow Cover

Designer: Daisi Toegel
Website: www.flowersew.com
--------------------------------------------
Category: Patchwork
Size: 16in square
Skill level: Confident Beginner
Pattern notes:
- Read all instructions before starting.
- Seam allowance is 1/4in unless noted otherwise.
- WOF = width of fabric: assume 42in for yardage (YD); 18in x 21in for Fat Quarter (FQ); 9in x 21in for Fat Eight (FE).
Fabric Requirements:
|
Color 1 (c1) = Postcards |
1/2YD |
Front and back |
|
Color 2 (c2) = Counties White |
1 FE |
|
|
Color 3 (c3) = Roadmap Tan |
1 FE |
|
|
Color 4 (c4) = Counties Pumpkin |
1 FE |
|
|
Color 5 (c5) = Counties Blue |
1 FQ |
Handle|Zip tabs|Pocket edge| Pocket lining |

You’ll also need:
*(1) 16 1/2in square
(1) 9in x 16 1/2in rectangle and
(1) 1in x 12in rectangle
of quilt batting (TIP: use scrap batting for this project and join the pieces together to reach the size needed)
*(1) 16in pillow insert
*(1) 16in zipper
Tools needed:
RM-SG; RM-SG-01 18" x 24" Green Double-Sided, Self-Healing Rotary Mat
45mm RTY-2/C Quick-Change Rotary Cutter, Aqua
QR-6x24 6" x 24" Frosted Acrylic Ruler
QR-6x12 6" x 12" Frosted Acrylic Ruler
Cutting instructions:
C1 = Cut (1) 17in x WOF; Sub-cut (2) 17in x 16 1/2in rectangles (front and back);
C2 and C3 each = Cut (2) 2 1/2in x WOF strips; sub-cut (3) 2 1/2in x 8 1/2in rectangles (pocket patchwork strips);
C4 = Cut (1) 2 1/2in x WOF strips; sub-cut (3) 2 1/2in x 8 1/2in rectangles (pocket patchwork strips);
C5 = Cut (1) 16 1/2in x 9 1/2in rectangle (pocket lining);
Cut (1) 16 1/2in x 1 1/2in rectangle (pocket patchwork edge);
Cut (1) 12 1/2in x 4in rectangle (handle);
OPTIONAL: Cut (2) 2 1/2in square (zipper tabs).
OPTIONAL: If using lining fabric for the pillow, you’ll need the same amount of fabric of c1, cut in the same way of C1.

Prepare the body:
Baste the front and back rectangles on the batting pieces.
Fold one (17in) edge inwards twice by 1/4in. Sew it in place to finish the edge of each one.

On one of the body parts, place the zipper with the zipper teeth facing the inner part of the finished edge and sew along its entire length.

Place the zipper in the same way as the first time, on top of the other body part and sew in the same way.

The zipper is sewn.
ATTENTION: If you are using a zipper by the yard, zipper tabs will be needed. Sew them on the edges by folding a 2 1/2in square in half with right side out, then inwards towards the crease, enclose the zipper ends and sew to finish – don’t forget to add the zipper pull before you finish both zipper ends.
Sew the zipper on the pillow cover parts in same manner as previous steps.

Make the handle:
Fold the handle strip lengthwise with the right side out. Open and insert the batting piece (1in x 12in) below the creased line and fold the edges towards the creased line, and press.
Fold again so both finished edges are touching, secure with pins or clips and sew along both edges lengthwise to finish.

Sew the pocket patchwork:
Sew the patchwork strips as follows: C3 + C2 + C4 + C3 + C2 + C4 + C3 + C2.
Press all seams open.
Sew the pocket edge strip of c5 on top of the patchwork piece on the long edge (attention to directional fabrics).
Press seams towards the pocket edge.

Sew the pocket lining on the pocket patchwork edge. Press seams towards the pocket edge.

Fold the pocket lining so the wrong sides of the lining and patchwork are touching.
Insert the batting piece in between the fabrics and quilt or sew along the edge of the pocket to secure the batting in place.
Sew along all sides of the prepared pocket using 1/8in seam allowance to secure.

Sew the pocket:
Fold the base of the pocket 1/4in towards the lining and press
Position the base on top of the edge of the zipper on the front part of the pillow cover, pin and sew along the bottom edge and sides to attach the pocket to the pillow body.
***the zipper of the pillow cover is at the bottom, for reference.

Sew a second seam 1/4in below the seam you just finished, so the inner part of the pocket that is raw will be hidden.

Open and check if the inner base of the pocket is finished after the second seam sewn.

Sew the raw edges of the handle 5in far from each side of the back part of the pillow cover using a 1/8in seam allowance.

Finish the pillow cover:
With the batting side (inner part) of the pillow cover facing out, close the zipper halfway leaving space enough for your hand to be able to completely open the zipper when it’s time to turn the project right side out.
Clip/pin the bottom and side edges together and sew along them using 1/4in seam allowance.
Cut the corners diagonally, be careful for not cutting the seam, and finish the edges using zig zag stitch.

Carefully open the zipper and turn the project right side out, press well and you’re all done!


