Easy DIY Photo Snow Globe Ornaments
Easy DIY Photo Snow Globe Ornaments

Designer: Marcia Izabel Marchiori
YouTube: MarciaBel Vlog
Instagram: @marciabel
---------------------------------------

Welcome to this cozy winter craft tutorial! If you're looking for a fun and simple way to add a personal touch to your holiday season, you're in the right place. Today, I'll be showing you how to create adorable photo ornaments using just a few supplies. These little treasures are not only a delightful addition to your holiday décor, but they also make the perfect personalized stocking stuffers.
Whether you're crafting for friends, family, or just to add some festive cheer to your home, this project is sure to bring joy. The best part? It's quick, easy, and so much fun to make! So grab your supplies, and let's get started on these cute and memorable ornaments that capture the magic of winter.

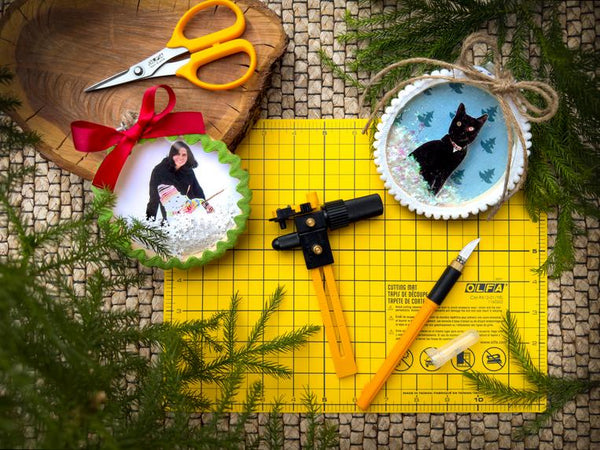
Tools & Supplies Needed
- OLFA CM-9x12-01/YEL Double-Sided Self-Healing Cutting Mat
- OLFA AAK-4 Cushion Grip Art Knife, paired with OLFA KB4-R/5 Curved Carving Art Blade
- OLFA 5-Inch SCS-4 Precision Appliqué Scissors
- OLFA CMP-3 Rotary Circle Cutter
- Wooden Hoop (diameter used: 4 inches)
- Hot Glue Gun (not pictured)
- Winter themed fabric (at least 5 x 5 inches per hoop)
- Printed photos of your choice, sized to fit in the hoops
- Trim for embellishment (used in this project: white pom pom fringe trim and green ric rac trim by Riley Blake Designs, Vintage 3/8" by Lori Holt of Bee in My Bonnet)
- (app. 15 inches)
- Jute twine or ribbon of your choice
- Sprinkles (snowflakes or any of your choice! Used in this project: Sparkle Pearl Mica and paper snowflakes).
- Acetate (approximately 5 inches square per hoop)
- Optional: a small piece of foam tape or thick cardboard (just enough to give a 3D effect to your photo)
- Fine Point Permanent Marker, pencil
Instructions
For this project, you will use embroidery wooden hoops as the base. To create a snow globe effect, it's ideal to select pictures with snowy landscapes that fit well within the wooden hoop. However, you can get creative with the background and decor accents.
You have two options:
1- Use the entire photo as the background:

2- Cut out the person or pet silhouette and use holiday-themed fabric for the background.
Let’s start with the second option!
- Using OLFA art knife paired with a curved blade and a cutting mat, carefully cut out your subject's silhouette from the photo. For this ornament, I'll be using a picture of my cat, Gema!


- Next, take your OLFA rotary circle cutter and cut a circle out of your chosen fabric. Make sure the circle is about 1 inch larger in diameter than your embroidery hoop. In my case, the fabric circle is 5 inches wide.


- Let’s move on to cutting the acetate. First, take the inner hoop and use it to trace a circle onto the acetate with a permanent marker. This will give you the exact diameter you need. Then, use OLFA precision appliqué scissors to carefully cut out the circle you just traced.
Note: For this step, we won’t be using the rotary circle cutter because we don’t want any holes in the acetate. Don’t worry if the circle isn’t perfectly cut—later on, we’ll cover the edges, so any imperfections will be hidden.


- Now, using the inner hoop as a guide again, trace and cut the base of your silhouette. Try to center the subject within the circle, making sure it is as symmetrical as possible. This will help your design look balanced when assembled.


- Insert the fabric between the two parts of the embroidery hoop, but note this important detail: you’ll be placing the fabric under the inside wooden circle, not on top, as you would with regular embroidery. The result will look like this:

- Once the fabric is securely in place, and using OLFA precision appliqué scissors, trim the excess edges around the hoop for a clean finish.

- Next, use hot glue to adhere the silhouette to the hoop, making sure it is centered within the inner hoop. If needed, cut a tiny piece of foam tape or thick cardboard to add a 3D effect to your photo (see below). This will help give your silhouette some dimension and make it stand out more within the ornament.


- Once the hoop is stabilized in a horizontal position, fill it with mica powder or any type of snow effect sprinkle you prefer. This will create the snowy effect inside your ornament.

- Using hot glue around the entire circumference (edges), while keeping the hoop in a horizontal position and being careful not to spill the mica, adhere the acetate to the top of the hoop. Let it dry thoroughly.

- To finish the ornament, add Pom Pom Fringe Trim on top of the already dried acetate. Adhere the trim with hot glue, making sure not to use too much of it.

- Make a bow using double jute twine, and then adhere it to the top of the ornament. This will hide the ends of the Pom Pom Fringe Trim and add a charming finishing touch. Your ornament is ready!

SECOND OPTION: The Photo As The Background
- Now let’s create the second version by using the entire picture as the background of your ornament. First, place the inner hoop on the photo and trace its circumference with a pencil. Then, use OLFA scissors to cut out the circle. Don’t worry if the cut isn’t perfect—the edges will be hidden behind the hoop.


- This time, we’ll start with the front. As you did in the first option, trace the acetate circle with a permanent marker and use OLFA scissors to cut it to fit the front of your hoop. Then, use hot glue to adhere the acetate to the front of the hoop.

- To finish the ornament, add an embellishment to the top of the already dried acetate, just as you did in the first version. Carefully adhere the trim with hot glue. In this option, I decided to use a large ric rac trim for a different finishing touch!

- Once the hoop is stabilized in a horizontal position, fill it with snowy sprinkles on the inside of the acetate.

- Still keeping the hoop in a horizontal position, use hot glue to carefully adhere the already cut photo to the back of the hoop, with the front side of the picture facing the sprinkles you just added. Turn it around, add a bow made out of ribbon (or any embellishment you like), and your second (and any additional) ornament is ready!


Don’t forget to tag me @marciabel and @OLFA_craft in your finished ornaments, we would love to see your holiday creations.
Happy Winter!
Marcia
