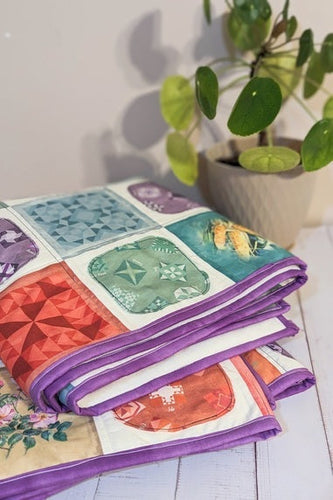
Applique and fussy cut IOWA Bed runner

Designer: Daisi Toegel
Website: www.flowersew.com
--------------------------------------------
Size: 33” h x 99” W
Skill level: Confident Beginner
Pattern notes:
- Seam allowance is ¼in unless noted otherwise.
- WOF = width of fabric, assume 42”.

Fabric Requirements:
|
Color 1 (c1) = Blocks barn red |
1/4yd |
Applique piece |
|
Color 2 (c2) = Blocks barn blue |
1/4yd |
Applique piece |
|
Color 3 (c3) = Blocks grass |
1/4yd |
Applique piece |
|
Color 4 (c4) = Blocks eggplant |
1/4yd |
Applique piece |
|
Color 5 (c5) = Blender cloud |
1 1/3yd |
Applique block background |
|
Color 6 (c6) = PANEL stripe*** |
2yd |
Fussy cut square blocks |
|
Color 7 (c7) = Blender orchid |
1/2yd |
Binding |
|
Color 8 (c8) = Blender Cloud |
3yd |
Backing |
*** 2yd of the PANEL have (9) rows of 7 squares each, if cut accurately. For this project (8) rows and 54 squares will be used.

You’ll also need:
*(1) 40” x 110” quilt batting piece (TIP: use scrap batting for this project and join the pieces together to reach the rectangle size needed)
*OPTIONAL: Heat’n’Bond to stabilize the applique squares. Approximately 2yd (considering Heat’n’Bond width of 20”).
Tools needed:
RM-SG 18”x24” Green Double-Sided, Self-healing Rotary Mat
45mm RTY-2/C Quick-Change Rotary Cutter
QR-6x24 6”x24” Frosted Acrylic Ruler
QR-4S 4 1/2" Square Frosted Acrylic Ruler
QR-6S 6 1/2" Square Frosted Acrylic Ruler
7-Inch SCS-2 Serrated-Edge Stainless Steel Scissors
Cutting instructions:
Color 1 and Color 2, each:
Cut (2) 4 1/2” x WOF; sub-cut (14) 4 1/2" squares.
Color 3 and Color 4, each:
Cut (2) 4 1/2” x WOF; sub-cut (13) 4 1/2" squares.
***Cut C1 through C4 and round the four corners with the Serrated-Edge Steel Scissors.

Color 5:
Cut (8) 6” x WOF; sub-cut (54) 6” squares.
Color 6 (PANEL):
To cut the panel, first divide the rows, cut all rows then the squares individually to 6” x 6” each. You’ll need (54) fussy cut squares. ***Fussy cut is the term that defines cutting an image from fabric inside specific measurements, in this case each image on the panel is meant to be cut to 6” x 6” square.


Color 7 (binding):
Cut (7) 2 1/2” x WOF strips. Join them on the 45-degree angle for binding making. Press in half lengthwise and set aside.
Once you have all pieces cut, it’s time to start the applique blocks.

Applique blocks:
All the 4 1/2” squares of C1 through C4 with the rounded corners will be sewn to the 6” squares of C5.
If using Heat’n’Bond, fuse it on the back of fabrics C1 through C4 according to the manufacturer’s instructions before rounding the corners.
To applique, lay (1) 4 1/2" square of the C1 to C4 colors on top on the center of a 6” square of C5 and using a 1/8” seam allowance, sew along the edges of the 4 1/2" square with a high contrasting thread color, I used black thread for this whole process.
Don’t backstitch, start sewing, and when meeting back at the beginning sew past the starting point to secure the seam.

After all (54) applique blocks are sewn, start assembling the quilt top.

Assembling the quilt top and finishing the project:
Follow the chart below to assemble the top in a 6 x 18 grid. Arrange the fussy cut blocks and applique blocks alternating on each row. Three rows start with the applique blocks, and three rows start with the fussy cut blocks. Attention to print direction on the fussy cut blocks when sewing the rows.

Press all seams open, baste and quilt using your favorite method.

Here are 3 suggestions on how to quilt:
1) Overall quilt, on top of the applique blocks; or around the applique blocks only, with free motion on the spaces in between;
2) Straight lines on each side of the blocks’ seams (used for this project).
3) Sew around the applique seams to create a thicker line on the applique blocks, and leave the fussy cut blocks unquilted for a puffier quilt.

Trim the project to 33” x 99” and bind using your favorite method.
Congratulations! You’re all done.


