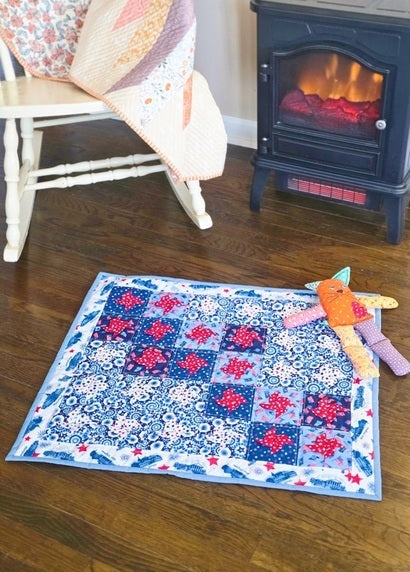
All Mid-Atlantic Interactive Pinwheels Baby Playmat

Designer: Daisi Toegel
Website: www.flowersew.com
--------------------------------------------
Category: Patchwork/Quilting
Size: 28in x 24in
Skill level: Confident Beginner
Pattern notes:
- Read all instructions before starting.
- Seam allowance is 1/4in unless noted otherwise.
- WOF = width of fabric: assume 42in for yardage (YD); 18in x 21in for Fat Quarter (FQ); 9in x 21in for Fat Eight (FE).
Fabric Requirements:
|
(30 blocks = 5 x 6 grid | 4 1/2in unf. block size) |
||
|
Color 1 (c1) = Stars Navy |
1 FE |
Background |
|
Color 2 (c2) = Flags Blue |
1 FE |
Background |
|
Color 3 (c3) = Flags Navy |
1 FE |
Background |
|
Color 4 (c4) = Circle Stars Blue |
1/3 YD |
Background |
|
Color 5 (c5) = Stars Red |
1 FQ |
Pinwheel |
|
Color 6 (c6) = Stars White |
1 FQ |
Pinwheel |
|
Color 7 (c7) = Capitals |
1/3 YD |
Borders |
|
Color 8 (c8) = Blender White |
1 YD |
Backing |
|
Color 9 (c9) = Blender Blue |
1/4 YD |
Binding |

You’ll also need:
*(1) 30” square of quilt batting (TIP: use scrap batting for this project and join the pieces together to reach the size needed)
Tools needed:
RM-SG 18”x24” Green Double-Sided, Self-healing Rotary Mat
45mm RTY-2/C Quick-Change Rotary Cutter
QR-6x24 6”x24” Frosted Acrylic Ruler
QR-4S 4 1/2" Square Frosted Acrylic Ruler
Cutting instructions:
C1 and c2 = Cut (3) 2 1/2in x WOF strips; sub-cut (20) 2 1/2in squares for each color;
C3 = Cut (2) 2 1/2in x WOF strips; sub-cut (16) 2 1/2in squares;
C4 = Cut (4) 2 1/2in x WOF strips; sub-cut (64) 2 1/2in squares;
C5 = Cut (6) 2in x WOF strips; sub-cut (56) 2in squares;
C6 = Cut (7) 2in x WOF strips; sub-cut (64) 2in squares;
C7 = Cut (4) 2 1/2in x WOF strips; sub-cut (4) 2 1/2in x 24 1/2in – for entire border strips; if you prefer to save on fabric and do strip piecing, cut (3) 2 1/2in x WOF, sew them on the short edge and sub-cut (4) 2 1/2in x 24 1/2in pieces.
C8 = Baste the quilt top on 1yd of fabric before quilting (the minimum area used is 30in square).
C9 = Cut (3) 3in x WOF strips, join them on the short edge on the 45-degree angle, press seams open and then all along the long edge in half with right side of the fabric facing out.

Block construction:
- There are:
5 blocks of c1
5 blocks of c2
4 blocks of c3
16 blocks of c4
All c1, c2 and c3 blocks are pieced with c5 fabric for the pinwheel.
All c4 blocks are pieced with c6 fabric for the pinwheel.
Follow the layout below to sew the rows and complete the patchwork top:

- To sew each block, you’ll need to sew the 2in squares of the pinwheel fabric as corners on each 2 1/2in background square.
- Take (1) 2in square of either c5 or c6, following Step 1 previous instructions to match background and pinwheel fabrics, and first fold the square diagonally and then fold the tip of the triangle formed towards the 90-degree corner.

4. Clip or pin the origami piece to one of the corners of a 2 1/2in square and sew it in place using a 1/8in seam allowance.
5. Repeat this process for all c1, c2, c3 and c4 2 1/2in squares.
6. IMPORTANT: it is NOT recommended that you use directional fabrics in this project as the squares will be constantly turned to form the pinwheel.

7. Now for each block, gather 4 parts/square units to make (1) block at a time, and turn the direction of the pinwheel according to the photo below. Sew top and bottom rows of 2 squares each, then sew them together to form the 4-patch pinwheel block.
8. Repeat this process for all blocks.
Trimming the blocks should not be necessary, but if you happen to stretch the fabrics a bit and wind up having to trim, the blocks should all measure 4 1/2in unfinished.

Press the seams open for each step. The seams will be a bit thicker than a regular pieced quilt due to the double layer of fabrics from the pinwheel unit.
TIP: Before pressing, spray water on the seams as you go, and then press holding the iron on top of the wet seams for a few seconds. This should help to flatten the seams considerably.

Once all blocks are sewn and pressed, it’s time to piece the rows.

Organize the blocks together before sewing, and follow the layout on step 1.

Finishing the playmat:
1) After piecing the rows, sew the top and bottom borders, and press the seams towards the borders. Sew the side borders, and press seams towards the sides.

2) Baste the quilt sandwich and quilt in between the blocks without sewing on top of the pinwheels. The pinwheels seams will be bulky and could break your needle.
3) Trim the batting excesses and bind using your favorite method.

