Slice & Stitch: Color Pop Table Runner

Designer: Cindy Staub
--------------------------
Sometimes I just need a project that has no direction. There are just times I need to sit and cut fabric and play with colors and textures. My color pop table runner is a fun project to stretch your creativity. There is no formal pattern, this project is more about the process and there’s lots of room for you to put your creative spin on it. I hope that you have fun playing with color and quilting to make this fun textured table runner.

Tools:
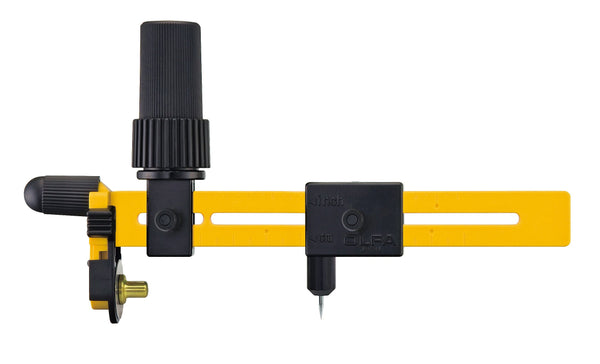
- OLFA CHN-1 Chenille/Textile Cutter
- OLFA 45mm RTY-2DX/PBL Ergonomic Rotary Cutter, Pacific Blue
- OLFA CMP-3 Rotary Circle Cutter
- OLFA RM-MG 24" X 36" Green Double-Sided, Self-Healing Rotary Mat
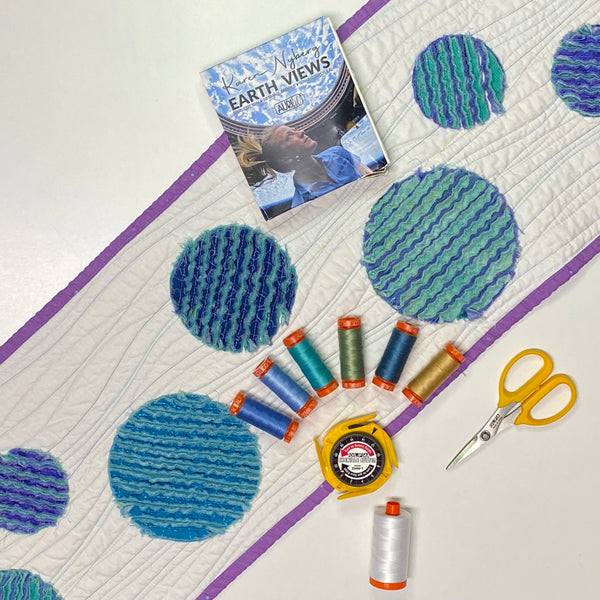
- OLFA 5-Inch SCS-4 Precision Appliqué Scissors
- Aurifil- Karen Nyberg Earth Views 100% cotton 50wt thread
- Marcus Fabrics- Choose to Be by Sarah Maxwell
- Backing and binding- ½ yard
- Several coordinating and contrasting fat quarters and scraps
- White Kona Cotton – 1/3 yard
- Batting- 12” x 40” rectangle

Cut White Kona Cotton (or background fabric of your choice) to measure 12” x 40”.
Cut batting to measure 12” x 40”
Cut fabric backing to measure 14” x 42”

Layer backing, batting and background fabric to make a quilt sandwich. Pin to hold layers in place.

Quilt as desired. I used the walking foot attachment to do wavy quilted lines. I used several of Karen Nybergs Earth Views Aurifil thread for the quilting. I quilted lazy waves down the length of the long table runner. I enjoyed changing out the colors as I quilted each line. Sometimes I echoed a previous quilted line and other times I crossed lines to create a textured quilted background.

There are no set rules here, have fun quilting. Just think of the possibilities, quilted circles, squiggles, blocks, the sky’s the limit.

From your coordinating and contrasting fat quarter and fabric scraps cut a bunch of circles. I cut 3”, 4 ½” and 5 ½” circles. For each ‘color pop’ you will need a stack of 5 fabric circles of the same size right side up. For mine I used 2- 5 ½” circle fabric stacks, 2- 4 ½” circle fabric stacks and 3- 3” circle fabric stacks. I mixed and matched the colors for each of the circle groups. There is no right or wrong way to group your colors together in each stack. But it is important to line up the grain of fabric in the same direction in each of the circle groups.

Place your fabric circles onto the top of your quilted table runner in a pleasing arrangement. Pin them in place. I line my pins to show me the line against the grain of the fabric.

On the circles stich thru all the layers a line running against the grain of the fabric. Sew lines ½” apart from each other until the circle is covered. Repeat on all the circles.

It’s now time to cut the fabric circles. Using the OLFA Chenille Cutter cut between the quilted table runner top and the 5 layers of the cotton circles. You will only cut through the 5 layers of circle fabric. Cut between each ½” stitched line.

Bind your table runner using your favorite method. I flipped the backing to the front and stitched it in place for an easy binding.
Now it’s time for the magic of making chenille…. Throw your table runner in the washer and dryer. This step will turn your table runner into a delightful textured piece. I just love how the chenille fluffs up and how my circles turned into multicolored circles. Some of my circles are more blue and others appearing more purple.

Just think of the possibilities with this process. How about using a navy blue background and tones of white and cream for ‘snowballs’? For a galaxy look how about a navy-blue background and combos of oranges, blues and green for the planets… or brightly colored primary colors for the circles on a birthday novelty print for a fun birthday table runner.

------------
Be sure to head over to the Aurifil Blog to see how Aurifil Artesian, Allie McCathren exhaustedoctopus, used her assigned products to create this beautiful wall quilt!

GIVEAWAY ALERT!!
To enter-to-win OLFA’s Chenille Cutter & Earth Views by Karen Nyberg, click HERE or on the image below. We’ll select one winner for this week’s giveaway on Monday morning and send notice via email. Good luck!