Sewalong to the Laurel Dress by Styla Patterns

Designer: Catherine Holbrook
Youtube: @bringingsewingback
-----------------------------------------------
Size or Dimensions: reference fabric requirements chart for the exact yardage needed for your size
Skill Level: Confident Beginner

Description: Have you ever wanted to add a scalloped edge to one of your garments? Well, lucky you because there is an OLFA tool just for that! The CMP-3 Rotary Circle Cutter makes cutting full circles or half-circles (scallops) a breeze. You can create scalloped edges on paper patterns as guidelines for sewing -OR- you can use the rotary cutter to directly cut scalloped edges on non-fraying knit fabric. Think swimwear and athletic fabric!
This rotary circle cutter is specially designed with a patented ratchet handle to reduce twisting and straining of the wrist. This tool can accommodate any circle size between 1.5-8.75 inches. That’s a wide range!
This tutorial will take you through the process of modifying a straight edge faux button placket into a scalloped edge. We will be using the FREE Laurel Dress Pattern by Styla as an example. Once you learn this technique though, you can add scalloped edges to ANY hemline on any type of garment. Grab your Rotary Circle cutter and let’s get started!

Tool & Supplies needed:

OLFA Products:
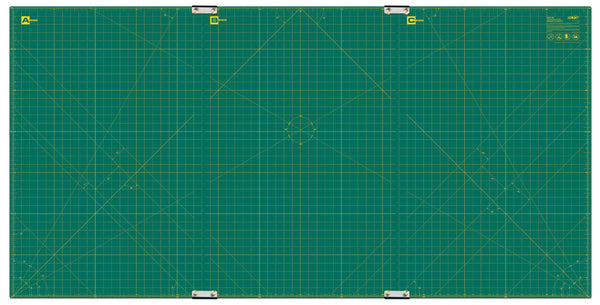
RM-CLIPS/3-01 35” x 70” Continuous Grid, Double-Sided, Self-Healing Rotary Mat Set
5-Inch SCS-4 Precision Appliqué Scissors
QR-6x12 6" X 12" Frosted Acrylic Ruler
Marking Pen
Additional Items Needed if completing the Laurel Dress Pattern:
RTY-2DX/MAG 45mm Ergonomic Rotary Cutter
45mm OLFA Endurance Rotary Blade
Set of Buttons (however many you’d like to add!)
Fabric:
Approximately 3 yards (see fabric requirements for your size!) of light to medium weight knit fabrics with good stretch and recovery. Ideal fabrics would be: Bamboo French Terry, Brushed Polyester, Cotton Lycra, Modal, or Rayon Spandex.
Sewing Pattern: The FREE Laurel Dress pattern by Styla Patterns can be downloaded here.
Rotary Circle Cutter Tutorial:
Let’s begin by running through how to use the Rotary Circle Cutter and it’s components! There is an excellent Youtube Tutorial on how to use the Rotary Circle Cutter if you prefer a video format.

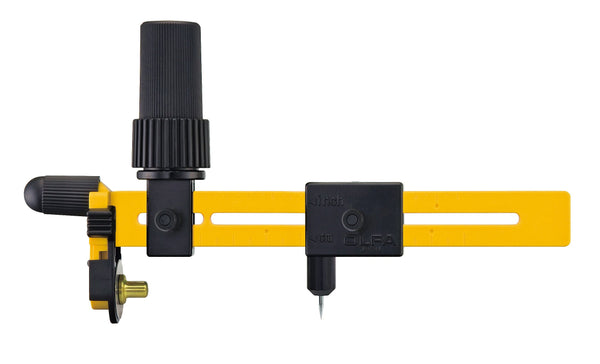
There are three main components to the Rotary Circle Cutter.
1) The 18mm rotary blade
2) The Pivot Point
3) The Ratchet Wheel Handle
The 18mm Rotary Blade:

The rotary circle cutter includes an 18mm blade which is the same blade used for the 18mm rotary cutter. The 18mm blade is small, but sharp! To ensure protection while not in use, this tool includes a blade guard.

To remove the blade guard, squeeze the black handles and pull down to expose the blade. To replace, squeeze the black handles again to push the blade guard back into place.


The Pivot Point:

The Pivot Point has a black safety cap covering the pin. The black cap can be removed by pulling off and can be stored on the front of the tool while in use.

Connected to the pivot point is the knob for adjusting the size of the circle you’d like to make. The rotary circle cutter can create circles from sizes 1 1/2” up to 8 3/4”! To adjust the knob, twist to the left. The pivot point can now move freely.


The distance between the blade to the pivot point is half the size of the circle you want to make. For example, if you want to make a 6 inch circle, you would measure 3” between the blade to the pivot point. Once the pivot point is in the correct place, twist the knob to the right to tighten.

The Ratchet Wheel Handle:

This patented ratchet wheel handle was specifically designed for right and left users in mind! The ratchet handle allows you to spin the rotary cutter in a complete circle without twisting or straining your wrist. With your hand on the ratchet wheel, spin the rotary circle cutter clockwise, similar to how you would stir a pot of soup. If applying to fabric, disregard slight movement or bunching. The fabric will self correct.


If cutting a smaller circle, you may need to rotate forward and ratchet back in order to make a complete turn around the circle. See this in action in the Youtube tutorial linked above! From the photo below, you can see that a 3” distance between the pivot point and the rotary blade resulted in a 6” circle.

Now that you’ve been introduced to the functionality of the rotary circle cutter, let me show you how to use it in action!
How to Create a Scalloped Edge on the Laurel Dress:
For this project I cut the following pieces:
Front Bodice Block (cut 1 on the fold - 1 Main)
Front Bodice (cut 1 on the fold - 1 Lining)
Back Bodice (cut 2 on the fold - 1 Main and 1 Lining)
Front Shoulder Strap (cut 4 as 2 mirror image sets - 1 Set Main and 1 Set Lining)
Back Shoulder Strap (cut 4 as 2 mirror image sets - 1 Set Main and 1 Set Lining)
Simple Skirt (cut 2, 1 Main on the simple fold line and 1 Main on the button placket fold line)
Gathered Flounce Sleeve (cut 2 as a mirror image set - 1 Set Main)
A Few Notes Before We Begin:
Any size scallop can be added to your garment by adjusting the pivot pin knob. However, you have to account for seam allowance when doing this. On this particular pattern, the faux button placket is 1” wide. This means that we cannot create a scallop any larger than would accommodate a 1” wide seam allowance unless we altered the design of the pattern.

So, for this project we will need to create scallops that allow for a 1” wide seam allowance (left to right). The length of that scallop (from top to bottom) will be double that. That means that our scallops will be 2” in length and 1” wide.


Creating the Front Bodice Scalloped Edge:
These specific steps will vary from the Laurel Tutorial. The rest of the tutorial remains the same.
Locate the front bodice block piece and fold right sides together. Press and pin the center fold. Set aside.


Locate the front bodice pattern piece. Using your 1" X 12" Frosted Acrylic Ruler and extra paper, extend the front center fold line by 1 1/4”. (The pattern piece will be shown from the backside so that the scallops can be made by turning the rotary circle cutter clockwise).


Measure 1 1/4” away from the new center fold line and draw a vertical line. The QR-1x12 ruler is the exact width for this! This drawn vertical line will be the pivot placement for the Rotary Circle Cutter in a future step. (The extra 1/4” allows for seam allowance when sewing the scalloped edges.


Measure 3/8” up from the bottom of the newly drawn vertical line and make a mark.

Grab your rotary circle cutter and your ruler. Remove the safety cap and store on the front of the tool. Lower the blade guard to expose the rotary blade. Adjust the knob to set the pivot point to 1”.

Place your front bodice pattern piece onto of your rotary mat. Insert the pivot point into the 3/8” mark at the bottom of the pattern piece.

Using the ratchet handle, slowly begin turning the rotary cutter, cutting the paper until the rotary blade reaches the vertical drawn line again. An *almost* complete half circle should be cut.

Remove the pivot pin from the mat. Line up the rotary blade with the previous ending spot, and place the pivot pin back into the mat along the drawn line.


Just as before, using the ratchet handle, slowly turn the rotary cutter until it reaches the drawn line again. This should create a *complete* half circle (scallop).

Repeat this step until you reach the top of the front bodice pattern piece. Remove the trimmed off paper.

Using this pattern piece as a guide, line up the scalloped edge 1/4” away from the center front of the front bodice block. Ensure the entire pattern piece fits nicely inside the bodice block.


Draw the scallop outline onto the bodice block using your marking pen. Cut the rest of the pattern out with your rotary cutter. This is now your front bodice piece.


Using the markings as a guide, sew along the scallops on your front bodice with a straight stitch.


Trim the seam allowance down to a scant 1/8” and clip into each point.

Turn right sides out and press.

Fold the fabric wrong sides together. Sew 1” away from the scalloped edge to create the faux button placket. Press the faux placket to the right and baste the top and bottom down to stay folded to the right.


Creating the Front Skirt Scalloped Edge:
Locate the simple skirt that was cut at the button placket fold line (it will be the wider skirt piece). Fold the skirt fabric wrong sides together so that there is a 1” (2.5 cm) overhang.


Press and pin the center fold.

Locate the front skirt pattern piece. Using a ruler, measure 1 1/4” away from the center fold line and draw a vertical line. This drawn vertical line will be the pivot pin placement for the Rotary Circle Cutter in future steps.

Measure 3/8” from the top of the newly drawn vertical line and make a mark. This will be the starting point for the pivot pin placement.

Repeat the same steps as above to create a scalloped edge along the skirt pattern piece, making sure to insert the pivot pin along the vertical drawn line.

Using this pattern piece as a guide, line up the scalloped edge 1/4” away from the folded center edge of the skirt.

Draw the scallop outline onto the skirt using your marking pen.


Using the markings as a guide, sew along the scallops with a straight stitch.

Trim the seam allowance down to a scant 1/8” and clip into each point.
Turn right sides out and press.

Fold the skirt wrong sides together. Sew 1” away from the scalloped edge to create the faux button placket. Press the faux placket to the right and baste the top and bottom to stay in place.


(By starting your pivot points at 3/8” away from the bottom of the bodice and from the top of the skirt, a complete half circle scallop will be created when the bodice and skirt are sewn together with the 3/8” seam allowance.)

To complete the rest of the dress, follow the instructions included in the free pattern tutorial.

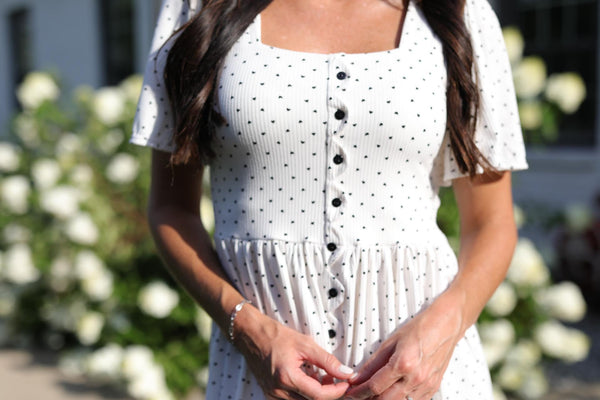
This same technique can be used directly on non-fraying knit fabric for a raw scalloped edge. No need to create a paper guideline! I’ve included some pictures of this technique completed on the hemline of an athletic dress I made recently.

My only recommendation would be to draw a pivot point guideline evenly around the hem of your garment (exactly as we did above) so that you know exactly where to place your pivot point to maintain an even hemline. Just make sure to use a washable marking pen or chalk so that it doesn’t stain your garment!
You now have the tools to apply scallop edges on almost anything you can think of!