Quilted Lanyard

Designer: Erin Kroeker
Website: www.theblanketstatement.ca
Instagram: @theblanketstatement
------------------------------------------------------
Finished Size: 1” x 30”
Skill Level: Beginner

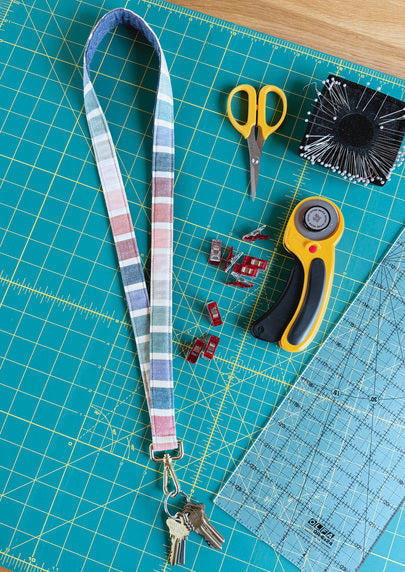
Got a pile of fabric scraps or leftover binding strips lying around? (Let’s be honest—who doesn’t?!) Put them to good use with this fun and reversible quilted lanyard! It’s quick to make, actually useful, and a perfect gift for just about anyone—teachers, friends, teens, kids, you name it. Keep it simple with solid strips or get creative by piecing together smaller scraps for a unique, scrappy look.
Take a look at this scrappy, selvedge edge lanyard I made to wear at QuiltCon!

And if you want to add even more personality, try some fun, decorative quilting stitches to make it one-of-a-kind! Easy, practical, and a great excuse to play with fabric—what’s not to love?

Tools Needed:
OLFA 24" x 36" Green Double-Sided, Self-Healing Rotary Mat
OLFA 45mm RTY-2/DX Ergonomic Rotary Cutter
OLFA 45mm Tungsten Steel Rotary Blade
OLFA QR-6x24 6" x 24" Frosted Acrylic Ruler
OLFA 5-Inch SCS-4 Precision Appliqué Scissors
Fabric & Supplies:
(2) 2” x 40” pieces of contrasting fabric
(1) ¾" x 40” strip of Batting (can also use felt, fusible fleece or interfacing)
(1) 1” Swivel Clip
(Optional) Fray Stop/Check or similar product
Sewing Machine*
Thread
Iron and Ironing Board
Pins or Clips
*A Walking Foot (or even-feed foot) and Zipper Foot are helpful, but not necessary!


Let’s get going!
Take your two fabric strips and place them right sides together. Sew a seam using a ¼" seam allowance down one long side.


Press seam allowance open. Then, fold the top and bottom edges towards the centre seam, aligning the long edges with the seam allowance. Press to create a crease.


Place your batting (or other stabilizer) under one of the folded sides. Lay the folded fabric back in place, on top of the batting.


Fold the entire strip in half and pin or clip in place approximately every 4-6".

Increase your stitch length (I like to use 3 – 3.5) and top stitch along both long edges, 1/8” from the edge.
TIP! A walking foot (or even-feed foot) can help ensure the layers feed evenly.


Trim the ends of your quilted strip to clean them up and remove any loose threads. Slide the swivel clip onto the lanyard.


Bring the two raw edges of your strip together, one on top of the other, making sure it is not twisted!
HELPFUL TIPS!
Consider how you’ll be using your lanyard before sewing!
You can place both “right” sides facing up for an upright loop that may be more comfortable around your neck. Alternatively, you can put the “wrong” sides together which will create a flattened loop.
Try both options before sewing it together to see which feels best!
Additionally, you may want to trim the fabric strip at this point to your desired length.
Keep in mind, the lanyard will be about ½" - ¾" shorter once completed.


Once you have your chosen alignment, sew the raw edges together using a ¼" seam allowance. Make sure to backstitch 2-3 times across the fabric strip for a secure closure!
If using fray stop, apply it to the raw edges of the seam allowance and allow it to dry completely.


Now gently open up the seam allowance you just sewed. Side the swivel clip to the seam, positioning it between both sides of the seam allowance. This will be the bottom of your lanyard.


Fold the strip upward, with the swivel clip facing away from the lanyard, enclosing the clip’s ring on the inside. Align the edges of the seam allowance with the edged of the strip.
Top stitch as close to the swivel clip as possible, backstitching to secure the stitches!
TIP! It may be helpful to use a zipper foot and move your needle all the way over to one side to do this.


Now give yourself a pat on the back, you did it!


