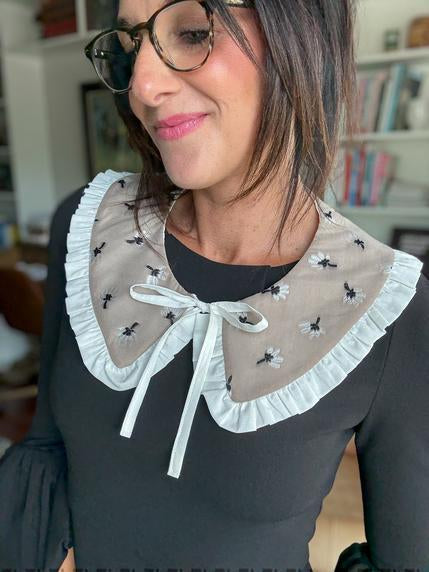
Oversized Detachable Collar

Designer: Catherine Holbrook
Youtube: @bringingsewingback
-----------------------------------------------
Category: Sewing
Size or Dimensions: 1 yard of fabric
Skill Level: Beginner

Description: Do you love the look of fancy collars? Well you’re in luck because today we are going to be sewing up this gorgeous oversized detachable collar! Not only is this pattern FREE, but it is a reversible pattern, meaning you can mix and match different fabrics for twice the versatility!
The collar includes a peter pan neckline, a ruffled edge, and a dainty bow closure. It’s perfect for layering over sweaters, dresses, jackets, you name it! While cottons are recommended for this project, you can certainly get creative and use sequined fabric, fur, leather, ect. It would make for a gorgeous collar for a special occasion. You can check out the hashtag #tillycollar on Instagram for inspiration!
This tutorial will not only take you step-by-step through the process of sewing up the Oversized Detachable Collar, but it will also teach you how to tie a perfect bow every time. Grab your Precision Appliqué Scissors and let’s get into this tutorial!

Tool & Supplies needed:

Approximately 1 1/8 yard of light to medium weight woven fabric. Cottons are ideal for this project, but you could also explore statement fabric like eyelits, denim, suede, fur, sequins, leather, ect. Less yardage is required if coordinating fabrics, making this a great scrap busting project!
OLFA RTY-2DX/MAG 45mm Ergonomic Rotary Cutter
OLFA 45mm Tungsten Steel Endurance Rotary Blade, 1 or 2 pack
OLFA RM-CLIPS/3-01 35" x 70" Continuous Grid, Double-Sided, Self-Healing Rotary Mat Set
OLFA QR-1x12 1" x 12" Frosted Acrylic Ruler
OLFA 5-Inch SCS-4 Precision Appliqué Scissors
*A ruffle foot or gathering foot is helpful for this project!
The FREE Oversized Detachable Collar pattern by Tilly and the Buttons will be used for this tutorial and can be downloaded at the link below.
Tilly and the Buttons - Free Pattern for Oversized Detachable Collar
There is also a Youtube Video Tutorial that walks you through each step of sewing this pattern.
Prep:
We will begin by printing and assembling the Collar pattern. The pattern is available in a letter file and includes 2 pages for printing.

With the the 45mm Ergonomic Rotary Cutter and the Continuous Grid Rotary Mat, cut out the pieces listed below. If you are finding your fabric is shifting on you while cutting, the Frosted Acrylic Ruler can help stabilize the fabric, giving you a precise cut!


For this project, you will cut the following pieces:
Collar Pieces - cut 2 on the fold on the bias (45 degree angle to the grain line)
*This can be the same fabric, or two coordinating fabrics.
Neck Ties - cut 2
Ruffle Pieces - cut 3 strips of fabric (25 inches x 3 1/8 inch)

Sewing Tutorial:
Prepping the Pieces:
Transfer all markings and notches to the pattern pieces. The most important notch to transfer is the notch 5/8” down from the front point of the collar.

Creating the Ruffles:
Locate the three ruffle pieces. Join two ruffle pieces, right sides together at the short ends, and stitch across the short ends with a 5/8” seam allowance. Press the seam allowance open.


Repeat with the third ruffle piece, creating one long strip of fabric.

At both ends of the strip, fold the two remaining short ends under 5/8” to the wrong sides and press. This will create neat ends to the ruffle when attached to the collar.

Fold your long ruffle strip lengthways, wrong sides together. Give it a good press.


Using your preferred method, gather the ruffle to the size of the collar. This tutorial will use a ruffler foot to complete the gathering. If opting for a long basting stitch, see the Tilly Buttons tutorial linked above.

Once gathered to the correct length, give the ruffles a final press.

Creating the Neck Ties:
To create the neck ties, we will double fold the fabric, similar to a binding. To begin, locate one neck tie piece. Press one short end under 5/8 inch.

Fold in half longways, wrong sides together and press creating a center crease.

Unfold the neck tie and press the raw edges of the sides to the center crease. Press flat.


Refold the center crease enclosing the newly folded raw edges. Give a final press.

Sew along the length of each necktie 1/8” from the edge with a straight stitch. Repeat the previous steps with the remaining neck tie.


Locate one collar piece. With the collar piece right sides up, and using the notches as guides, lay the raw edges of the neckties 5/8” from the edge of the neckline. Ensure the stitched edge is facing down. Pin in place.


Locate the ruffle piece. Aligning the raw edges, lay the ruffle onto of the outer edge of the collar piece. The ends of the ruffle edges should align exactly below the bottom edge of the neckties. Pin in place.

Using a 1/2” seam allowance, baste the ruffle and necktie pieces to the collar around the outer edge.

Locate the remaining collar piece. Lay the remaining piece on top of the other collar piece, right sides together, making sure to sandwich the ruffles and neckties inside.

Leaving a 2” gap at the center of the inner neckline, sew around the entire neckline with a 5/8” seam allowance. You may need to maneuver the neck ties and ruffles as you sew to avoid sewing overtop of them.


Trim the seam allowance down to a 1/4”, and clip into (but not beyond) the seam allowance all the way around the neckline using your Precision Appliqué Scissors. These scissors are sharp, and the perfect tool for clipping into seam allowances!


Reaching inside of the 2” gap, turn the collar right sides out and press. Tuck the seam allowance on the 2” gap to the inside and press.


Using your preferred method, close the 2” gap with stitches. You can topstitch, hand stitch, or use fusible glue. Give a final press.


How to tie the Perfect Bow:
The last step is to tie the neck ties into a bow. A few years ago I learned a bow tieing method that results in a perfect bow every time. Let me teach you how!
First, we will begin by crossing the right strap over top of the left strap.

Pull the right strap under and above the left strap creating a crossover.

Pull the right strap over and below the crossover so that both straps sit below the crossover.

On the right strap, pivot roughly 1.5” below the crossover and pull upwards. Pivot again roughly 2 inches away from the first pivot, and left the strap hang down. The top pivot will become the right side bow loop in a future step.

Pull the left strap overtop of the right strap through the opening between the crossover and the first pivot point. This now becomes the left hand bow loop.

Holding the left hand bow loop and the right hand bow loop, pull the bow taut creating a center knot. Adjust the loop tails to create the desired bow shape and size.

Voila! The perfect bow!