How To Make A Custom Fabric Covered Photo Frame

Designer: Marcia Izabel Marchiori
YouTube: MarciaBel Vlog
Instagram: @marciabel
---------------------------------------
Level: Beginner

Today, I'll show you how to transform an ordinary frame into a chic and unique custom upholstered piece using fabric. This project will elevate your special object, whether it’s a photo, a piece of art, or a cherished souvenir. By following these simple steps, your frame will harmoniously complement the highlighted item, becoming the centerpiece of your wall!
For my project, I chose to frame a small piece of ceramic handmade by me that I’ll cherish forever, but this technique is also a wonderful way to create a one-of-a-kind gift for your loved ones. The best part? It’s very easy to make and requires only a few inexpensive supplies. Let’s get started!

Tools & Supplies Needed
- OLFA CM-9x12-01/YEL Double-Sided Self-Healing Cutting Mat
- OLFA 5-Inch SCS-4 Precision Appliqué Scissors
- OLFA QR-6x12 6" X 12" Frosted Acrylic Ruler
- OLFA AK-4 Cushion Grip Art Knife
- Light colored frame, preferably white
- Pencil
- Mod Podge
- Foam brush or flat Paintbrush
- Patterned Fabric and plain fabric, with coordinating colors (enough to cover the frame)
- Cardboard or paperboard (you could even recycle a cereal box to make the passe-partout/mat)
- Hot glue gun or adhesive tape
- Optional (but so cute!): Ric Rac Trim (used in this project: Riley Blake Designs 1/4” Vintage Trim by Lori Holt of Bee in my Bonnet / Riley Red)
Instructions:
- First, let's measure and cut the fabric. If the fabric is wrinkled, iron it flat before continuing. Use the back of the frame as a guide for both the background and mat. With an OLFA art knife and cutting mat, cut the patterned fabric for the passe-partout and the plain fabric to the same dimensions for the background.

- Next, trim your patterned fabric so that it extends beyond the frame on all sides. For my project, about 2 inches was enough, but you might need a bit more if your frame is thicker.
Cut the paperboard to match the size of the frame's back using an OLFA art knife, ruler, and cutting mat. This will be used to make the passe-partout/mat.
These are the pieces you have so far:

- Apply Mod Podge to the front side of the frame using a foam brush for a very thin and even layer. Important: make sure the glue is spread thinly to prevent it from penetrating through the fabric.

- Now, working quickly before the glue sets, place the frame face down on the back of the fabric, using the fabric’s pattern as a guide for alignment, then press the frame firmly onto the fabric. Flip the frame over and gently smooth out any air bubbles or wrinkles with your fingers. Double-check the alignment and allow it to dry completely.

- Repeat the same process with the background fabric: apply Mod Podge using a foam brush, then attach the fabric to the front of the frame back. Gently smooth out any air bubbles or wrinkles with your fingers.

I
- Measure the thickness of the frame using an OLFA ruler. Draw a square on all four corners of the frame on the fabric with sides equal to the frame’s thickness.
For instance, if your frame is 3/8" thick, draw a 3/8" x 3/8" square on each corner:


- Now, using the ruler as a guide, draw a 45-degree line through the edges of each square, extending beyond the square. Repeat this step on all four sides. Then, using an OLFA art knife and cutting mat (use OLFA ruler if needed), carefully cut along these traced lines and AROUND the squares.


- With the OLFA art knife, cut just one side of each square. Repeat this process for all four corners, creating tabs that will help hide the corners neatly.

- Fold up each side of the excess fabric, applying Mod Podge to the frame as you go, and stretch it over the backside of the frame.


- Let’s create the window of your passe-partout: using an OLFA ruler and a pencil, draw diagonal lines across the paperboard to help you find the center of the rectangle. Position your object or photo in the center of the rectangle and trace around it.


- Decide the size and position of the window you want for your project. Then, using an OLFA ruler and pencil, trace a line 1/2 inch away from the outline of the object you just created. In this step, you have the flexibility to increase the space between the passepartout and the object, beyond the 1/2 inch if you prefer. The choice is yours!


- Using OLFA art knife, ruler and mat, cut out the offset rectangle you just traced.


- Again, repeat the process of applying Mod Podge to the paperboard using a foam brush for a very thin and even layer. Work quickly before the glue sets, place the mat on the back of the fabric, using the fabric’s pattern as a guide for alignment, then firmly press the frame onto the fabric. Flip the frame over and gently smooth out any air bubbles or wrinkles with your fingers. Double-check the alignment and allow it to dry completely.


- Using OLFA AK-4 knife with a curved blade, carefully cut along both diagonals of the window. Fold the triangles you just created to the back of the passe-partout and secure them with a thin layer of Mod Podge, removing any excess fabric.


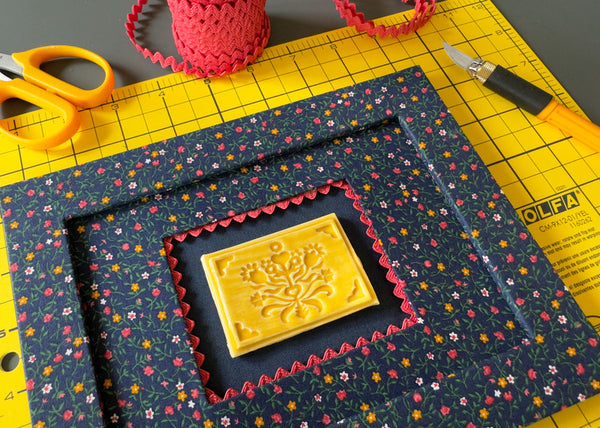
This is the result:

- Time to assemble the frame altogether:


- If you'd like to use ric-rac trim, simply glue it around the passe-partout window using hot glue or adhesive tape before assembling everything together.

And your frame is ready!

Don’t forget to tag me @marciabel and @OLFA_craft in your finished project, we would love to see your creation!

With love,
Marcia