How to make a basic superhero suit

Designer: Jedimanda
-----
How to make a basic superhero suit!
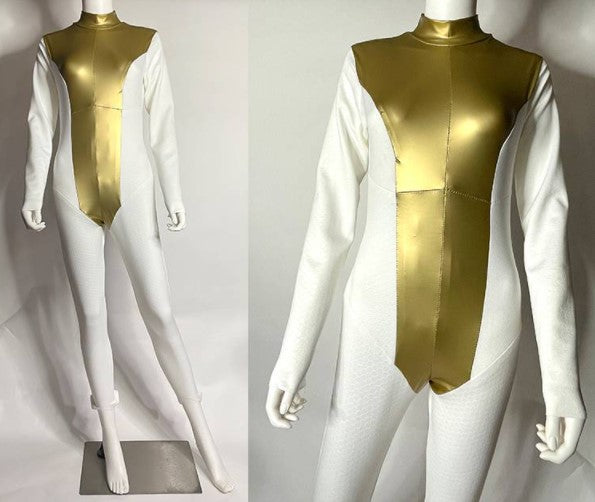
If you are a fan of any kind of superhero based fandom and want to cosplay from it, I guarantee you will need to make a superhero suit at one point. Most of the time, the seam work is similar and is just a tight suit that you can alter easily by just moving around some seam lines. Within this little tutorial, I’ll show you my favorite pattern and ways to alter it to fit your needs. The key with super hero suits is the right color choice, stretchy fabrics, and lots of fittings. Let’s get into it.
Skill level: Intermediate
Tools:

OLFA 45mm RTY-2/NS Quick-Change Rotary Cutter
OLFA 28mm RTY-1/C Quick-Change Rotary Cutter
OLFA NCM-L 24" X 36" 3mm Double-Sided, Self-Healing Cutting Mat
Materials
Pattern: McCalls 7217
2.5 yards of main 4 way stretch fabric
1 yard of contrasting 4 way stretch fabric
22” invisible zipper
Complimentary thread
Sewing Machine
Zipper foot
Stretch needles for sewing machine
Pencil or chalk to mark notches
Steps:
NOTE: I am using a store-bought pattern 7217 from McCalls. There are a lot of other “superhero suit” type patterns out there that you can choose from OR you can make your own.
If you are interested in making your own, using the “duct tape” method is one of my favorite ways to go. A basic Youtube search for that will get you started then you can reference back to this tutorial for great tips and tricks on how to complete it once you have your pattern base.


1. You have your chosen fabric, so let’s lay out the pattern pieces on our fabric and slice away. I recommend using a brand new sharp blade to cut the 4 way stretch lycra/spandex fabric.


2. When you get to the bottom of the leg patterns, I recommend switching to a smaller OLFA rotary cutter, like the 28 mm, to curve around those edges better. Don’t forget to cut on a sturdy self healing mat.

3. Once you have all the pieces cut out, don’t forget to transfer all the notches and marks. You’ll these need to fit everything together.

4. One of the things I like so much about this pattern is the amount of seam lines. I can easily take in or take out fabric making the suit fit better. If you are curvy, like me, you can work with this design better. The suit will hug you well if its tailored correctly.
5. Let’s go into the first steps of this pattern by attaching the front pieces together using a 2 by 2 zig zag stitch option on your sewing machine. This type of stitch will allow the fabric to stretch without breaking the sewn seam lines.
6. We are sewing 4 way stretch fabrics here so I HIGHLY recommend using a stretch or ballpoint needle for your sewing machine. This will prevent stitches from being skipped and the headaches you would eventually have.
7. Continue to follow the pattern directions and stitch the remaining front pieces to the side front pieces. Making sure you match the perpendicular seam in the front as shown. Having your seams match up like this assures your other pieces will line up correctly.


8. Now let’s work on the back pieces, stitch up those seam lines.

9. Front and back pieces are done, now attach at the shoulder seam lines.

10. Next, sew the center front, making sure everything lines up with the marks made.

11. Now your bodice pieces should be mainly together. Grab the collar, fold it in half lengthwise, wrong sides together and stitch together. I recommend stitching about 3/8” seam allowance versus the default 5/8” seam allowance. This makes it so this stitch doesn’t show in your next step.

12. Following the pattern direction, now stitch the collar to the bodice at the default 5/8” seam allowance.

13. Now I like to clip the curves and stitch down the excess seam allowance, this is similar to understitching.

14. Once the collar is in, it’s time to install the zipper. I recommend a big ole invisible zipper for this. Make sure you change your foot on your sewing machine to a zipper foot.


15. The zipper is installed, not my best work but it will do. Now stitch up your sides, don’t forget to change back to a zig zag stitch.


16. Once the sides are sewn, sew the crotch seam. At this point, I would try on the bodice to see if you need any alterations before you add the legs and sleeves in.


17. Now that your bodice piece fits well, stitch the seams for the sleeves and legs.
18. Let’s add the legs into the leg holes matching notches and do the same for the sleeves.

19. Stitch the arm and leg holes then turn everything inside out. Voila! You have a super suit!

20. Don’t forget to hem the sleeve edges and leg ends if you would like.


Check out all our cosplay tutorials here.