Gathering Apron

Cindy Staub
------------------------------
Sample made using Aunt Grace from Marcus Fabrics by Judi Rothermel
Materials:
¼ yard fabric for apron tie (red)
½ yard fabric for apron (yellow)
¾ yard fabric for gathered pocket
For the optional applique bee:
Bee Appliqué Template
Scrap fabrics in the following colors, black-bee body, yellow- bee stripes, white- bee wings
Black thread for machine applique
Fusible web
¾” elastic (22”)
Thread
Tools:
OLFA RM-MG 24" X 36" Green Double-Sided, Self-Healing Rotary Mat
OLFA 45mm RTY-2/C Quick-Change Rotary Cutter, Aqua
OLFA QR-6x24 6" X 24" Frosted Acrylic Ruler
OLFA 5-Inch SCS-4 Precision Appliqué Scissors
Straight pins
Safety pin
From Apron tie fabric (red) cut:
2- 4 ½” x WOF (width of fabric)
From Apron fabric (yellow) cut:
2- 15” x 22” rectangles
From gathered pocket fabric cut:
1 – 26” x 30” rectangle

- Sew the 2 apron strips right sides together along the short edge to make one long 4 ½” wide strip. Press seam open.
- Fold the long strip in half, right sides together along the long edge. Sew a ¼” seam along the long edge to form a long tube.


4. Fold the 26” x 30” rectangle in half wrong sides together so that it measures 13” x 30”. Press. Sew along the folded edge a 1” topstitch seam.

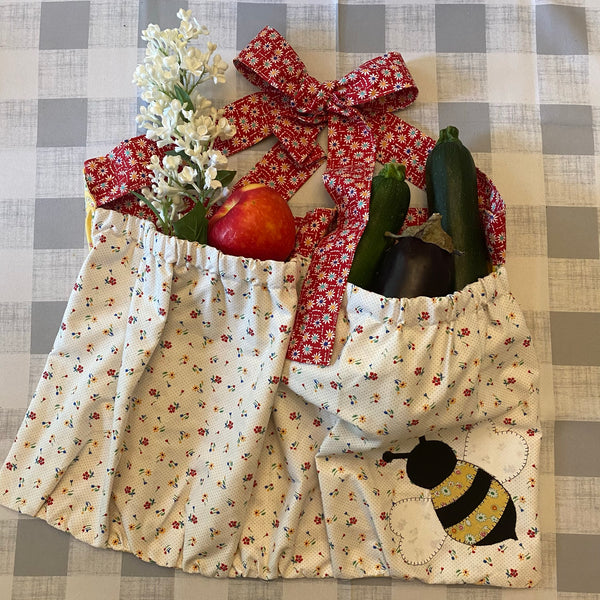
5. Optional Bumblebee design: Trace the bee design onto the paper side of the fusible web. Iron the fusible shapes onto the back side of the fabric. Bee body-black, wings- white, and bee stripes- yellow. Cut the shapes out using OLFA applique scissors. Layer the design onto the lower right corner and 1” from each edge of the gathered pocket section. Press in place using the fusible interfacing directions provided with your fusible web.


6. With black or dark brown thread stitch around the bumble bee design using a buttonhole stitch.

7. Cut the ¾” elastic to measure 22”. Thread the elastic thru the casing at the top of the gathered pocket piece. A safety pin is handy for doing this.

8. Secure the elastic in place with a pin and then top stitch it in place.

9. Gather the bottom edge of the gathered pocket piece to measure 22”.

10. Layer apron 15”x22” rectangle right side up, the gathered pocket right side up, and the second 15”x22” apron rectangle right side down.

11. Pin along the edges leaving a 3” gap for turning.

12. Sew a ¼” seam all the way around the apron rectangle remembering to leave a 3” gap.

13. Turn it right side out. Press.
14. Pin the apron tie to the front of the apron lining up the top edges and centering the tie onto the center of the apron.


15. Top stitch a 1/8” to ¼” seam along all the sides of the apron tie top stitching the apron in place.


16. Mark the center of your apron and either draw a fine line or use a few pins to show where the center is from the top of the apron to the bottom.

17. Stitch on this line. Do a triangle reinforcing stitch on the top of the pocket. This will form two pockets on the front of your apron.

Your gathering apron is complete! This is a wonderful apron to wear out in the garden for gathering produce such as green beans and zucchini. This apron is also handy for apple picking!


