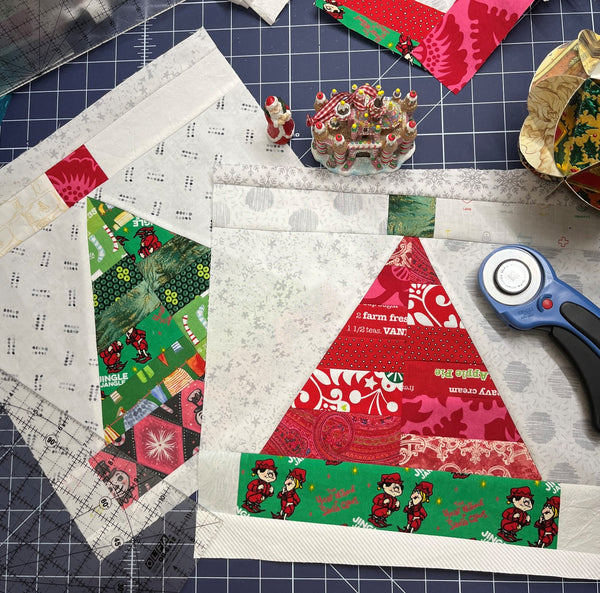
Fun & Funky Christmas Quilt Block Series – – Santa Hat Block

Designer: Scott Hansen
Instagram: @bluenickelstudios
Size or dimensions: 12 .5” x 12.5” unfinished block.
Skill level: Advanced Beginner or higher
-----------------------------------------------------
Play along with Scott from the Blue Nickel Studios as he presents a mini-series of prescribed improv blocks between now and Christmas. Three of the blocks easily can be done for other holiday happenings, so they are not just limited to the Christmas Holiday.
Check out the start of this series, Here!
Let’s get started on the last block – The Santa Hat (Not limited to traditional red and white!)
Tools and Supplies Needed:
- OLFA RM-MG/NBL 24"X36 Double-Sided, Self-Healing Rotary Mat, Navy
- OLFA 45mm RTY-2DX/PBL Ergonomic Rotary Cutter, Pacific Blue
- OLFA QR-6x12 6" X 12" Frosted Acrylic Ruler
- OLFA QR-6x24 6" X 24" Frosted Acrylic Ruler (for the larger cuts as needed)
- OLFA QR-12S 12 1/2" Square Frosted Acrylic Ruler
- Sewing machine.
- Thread
- Iron
- Pressing Surface
Fabric Requirements:
- Assorted Hat and Trim Colored fabric scraps – A Fat Eighth’s worth is more than enough for one block.
- Assorted Background fabric scraps – A Fat Quarter’s worth is more than enough for one block.
Cutting Instructions:
From Hat Fabric cut:
- (2) – 1.5” x 11” strips
- (2) – 1.75” x 11” strips
- (1) – 2” x 11” strip
- (1) – 2.5” x 11” strip

From Trim Fabric cut:
- (1) – 2” x 2” Square A
- (1) – 2.5” x 10” Strip B

From Background Fabric cut:
- (2) – 2” x 14” Strip C
- (2) – 2.5” x 3” Rectangle D
- (2) – 2” x 7” Rectangle E
- (2) – 7” x 8” Rectangle F

Construction:
- Sew Hat Strips together in rows as shown:


These can be in ANY order that you want!
- Then cut this block in half > Flip one side upside down > Sew these two halves back together as shown:


- From the top of the center seam, use the 30° line on your QR-6x12 Frosted Acrylic Ruler to guide your Rotary Cutter in cutting one side and then the reverse on the other side as shown:


The two triangles that you cut off of this piece can be used for another Hat block if you wish as long as they are slightly over 8” tall.
- Trim the pieced triangle to 8” tall as shown:

It doesn’t matter where you trim this as long as it is 8” tall. I trimmed off the top and bottom in this sample, but you can trim more off the top or bottom as you wish.
- Take one Background F Rectangle and use the 60° line on your QR-6x24 Frosted Acrylic Ruler to guide your Rotary Cutter in cutting a 60° cut on the left 8” side of the rectangle as shown:

- Sew this to the right side of the Hat Triangle as shown:


- Repeat with the remaining F Rectangle cutting in the opposite direction and sewing to the left side of the Hat Triangle as shown:


- Trim the Background even with the Hat Triangle as shown:

Doesn’t have to be exactly 8” tall at this point.
- Sew Background D Rectangles to both ends of Hat Trim Strip B as shown:


- Sew Background E Rectangles to 2 opposite sides of Hat Trim Square A as shown:


- Combine the Hat Trim Strips with the Triangle Hat Section as shown:


Center (or don’t center) the Hat Section as you see fit.
- Add the 2 Background C Strips to the top and bottom of the Hat Sections as shown:


- Trim to 12.5” x 12.5” Square with the QR-12S 12.5” Square Frosted Acrylic Ruler. Feel free to trim level or tilted!


Finishing Instructions:
Create more Santa Hat blocks in a variety of colors and make a runner or wall hanging or combine with the Wreath Block, the Stocking Block, and the Gift Block previously posted from the Fun and Funky Christmas Block series as you would any 12” finished block.