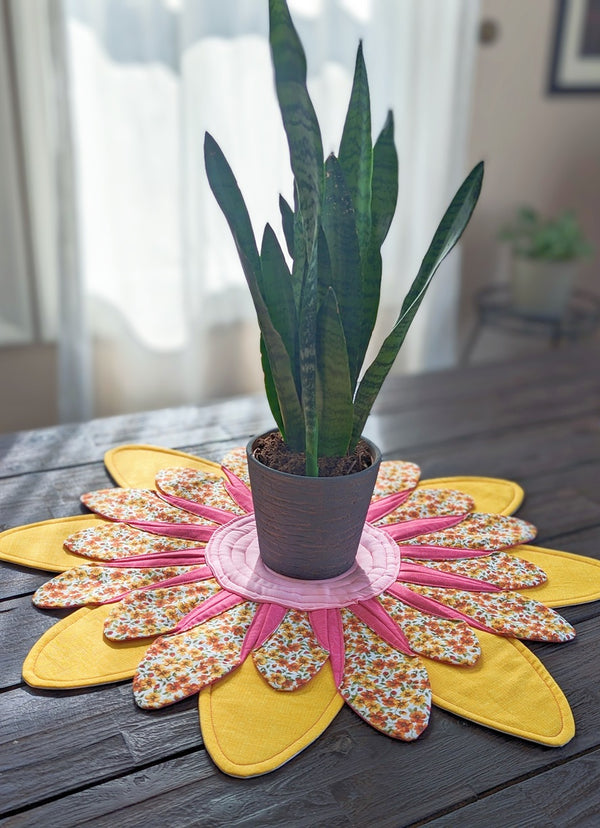
Flower Table Centerpiece

Instagram: @daisitoegel
Website: www.flowersew.com
------------------------------------------------
Category: Home Decor
Size or dimensions: 34in wide approximately
Skill level: Confident Beginner

It is the season for cheerful decoration as the days get warmer. Give your home a bloom of colors with a fun to make flower shaped table centerpiece.
Let’s get started.
Tools needed:
OLFA RM-SG; RM-SG-01 18" X 24" Green Double-Sided, Self-Healing Rotary Mat (or larger)
OLFA 45mm RTY-2/C Quick-Change Rotary Cutter, Aqua
OLFA QR-6x24 6" X 24" Frosted Acrylic Ruler
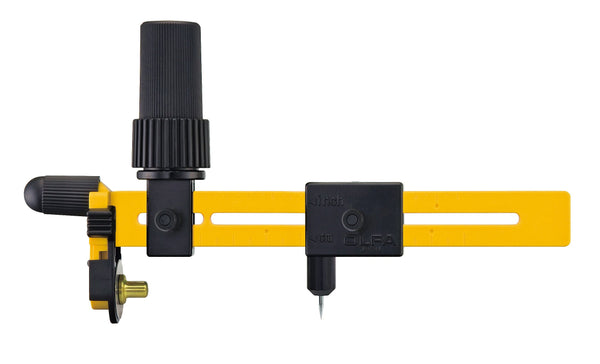
CMP-3 Rotary Circle Cutter
OLFA 5-Inch SCS-4 Precision Appliqué Scissors
Material requirements:
Print (1) copy of the petals TEMPLATE HERE at 100%
LARGE petals: 1/3yd – Cut (2) 6” x WOF strips from main fabric AND backing fabric
SMALL petals: 1/2yd – Cut (3) 4 ½” x WOF strips from main fabric AND backing fabric
CENTER circle: (4) 10” squares (one for main fabric and one for backing fabric)
BATTING:
Cut from scrap batting***: (8) LARGE petals, (16) SMALL petals and (2) 8 3/4” diameter circle
***follow instructions below to cut these pieces.
Template instructions:

The LARGE petal template fits horizontally on the 6” x WOF strips.
Cut the LARGE template fabric and batting pieces first.
When done cutting the large template pieces, cut the SMALL template from the printed template sheet.
The SMALL petal template fits horizontally the 4 ½” x WOF strips.
Sewing the petals:
For each petal, press one batting piece according to its size on the back of the main fabric piece.
Lay the backing fabric on top of the main fabric with right sides touching.
Sew a U around the shape leaving the bottom straight part open. Backstitch at the beginning and ending of the seams to secure.
On the curved parts make little cuts so when turning the petal to the right side out it will be flat after pressing.
Topstitch all LARGE petals 1/4” far from the edge. Don’t topstitch the SMALL petals.

Shaping the small petals:
For all SMALL petals, fold the bottom corners towards the center of the petal by 1/2" with the main fabric facing up.
Sew the bottom edge to hold the folding in place and press it.
Sewing the base:
Align the petals with main fabric facing up, each petal should overlay the next and the corner touch the center base of the next petal.
Pin the petals in place and sew an L on each petal to secure them all together.

Flip the centerpiece base and sew the back in the same manner.

Adding the small petals:
First, add one SMALL petal on each space in between the LARGE petals.
Sew the INNER side of the folded part of the small petals as shown by the arrows in the pictures below.
After sewing the first 8 petals, sew the other 8 lining up to the base petals on the center. Follow the black arrows in the picture below.
Sew in the same manner as previously, on the inner side of the folded part of the small petals.

Make and sew the center circles:
Using the CMP-3 Rotary Circle Cutter, cut an 8 3/4” diameter circle from a printer paper to use as template, this is the largest circle size the Circle Cutter cuts.
After cutting, align the Circle Cutter to 3” to cut a 6” circle, and cut it from the 8 3/4” circle previously cut. Fold it in half on both ways, to mark the center and align the Circle Cutter pivot point on this mark. Cut the 6” circle.
Using the 6” circle, align it on the center of the table centerpiece, and cut out the excess on the center to be open by 6”.
Using the 8 ¾” circle piece, cut (2) main fabric circles**, (2) backing fabric circles**, and (2) batting circles.
**The backing fabric circles won’t show when the centerpiece is finished, so any fabric goes. The main fabric circles should follow the same fabric used for the backing of the LARGE petals, and for the front (top) of the centerpiece, use a contrasting color.
Sew two circle units, one for the top and one for the bottom of the centerpiece.
Press one batting piece on the main fabric circle back, add the backing fabric piece right sides touching on the main fabric and sew all around the edges using 1/4in seam allowance.
Cut a small hole on the backing fabric (that won’t be seen when finished) to turn the circle right side out.
Repeat this process for both circle units. Press them well when done.
Align the circles in place at the same time, for the front and for the back of the centerpiece.
Guide the position by pinning on each side of the circle through the front first, then add the circle on the back following the pin mark, and pin the back on the center to hold both back and front circle units together.
Sew the circles in place, you can sew along the edges using 1/8in seam, or make a swirl like I did to hold the batting all together, instead of just the edges.
And you’re done!