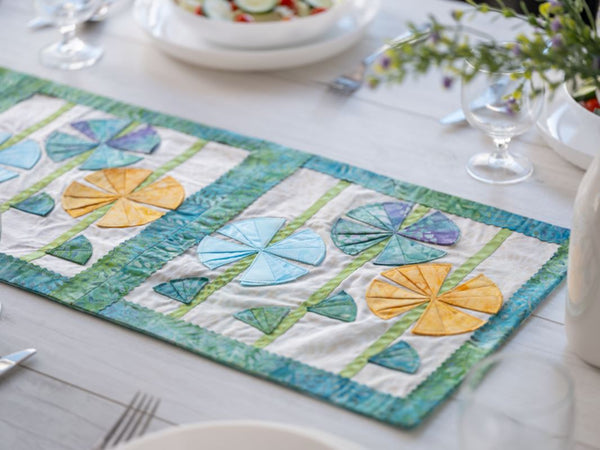
Blooming Table Runner
Designer: Sarah Gozzo
---------------------

The following directions will yield 4 finished 12.5” blocks. 3 blocks will be used to create a 12”x36” table runner. The 4th block can be framed as wall art or used to make a mini quilt. The directions for this block can also be used for a paper project!

OLFA TOOLS:
Pinking blade and Ergonomic Rotary Cutter
6”x24” Frosted Advantage Ruler
MATERIALS:
1/4 yard gold tossed leaves batik (flower)
1/4 yard light blue tonal batik (flower)
.5 yard green floral leaf batik (borders and leaves)
1 yard tossed pineapples batik (flower and backing)
1 yard bead flowers cream batik (background)
3/8” x21’ spool Offray ribbon in KIWI
June Tailor fabric glue stick temporary adhesive
Cotton Thread matching yellow, blue, green, purple
CUTTING:
Pro Tip: Spray starch and iron batiks before cutting will greatly improve accuracy and ease of cutting.
From the pineapple batik, FIRST cut a 5”xWOF strip for flowers. THEN cut a 12.5”X36.5” strip to use for backing. Set OLFA’s circle cutter to the 2” mark. Cut 16 circles from the 5”xWOF strip. These are PETALS.

From the yellow and blue batiks cut 16 circles from each strip with OLFA’s circle cutter set to the 2” mark. These are PETALS.

From the green batik, cut (4) 1.5”xWOF strips. For each strip: Use the 6”x24” frosted ruler to cover 1” of the strip then use the pinking blade to cut .25” off each strip. Cut the pinked strips into (12) 1.25”x12.5” strips. These are BORDERS.
From the green batik, cut a 9”xWOF strip. Set OLFA’s circle cutter to the 1.5” mark. Cut 16 circles. These are LEAVES.
From the cream batik, use OLFA’s 12.5” frosted ruler and a 45mm rotary cutter to cut a total of (4) squares for the BACKGROUND.
From green ribbon, cut (12) 12.5” lengths.
MAKE THE PETALS and LEAVES:
Move all the circles to your pressing table. Working with one circle at a time, fold the circle in half and press with a hot steamy iron.

Working with the half circle, FOLD by matching the bottom right point to the left top of the raw arch about .75” from the left point. Press.
Make a second fold in the same fashion by bringing the right toward the left. Press. The petal should look like a 3 piece fan. Each piece of this fan should be equal. Press the petal well with a steamy hot iron.
Repeat this process for every circle. Keep finished petals organized by color.
BLOCK ASSEMBLY

- Attach 3 ribbons to a background square. Lay the background square on OLFA’s 24”x36” rotary mat aligned with the mat’s guide lines. Use the fabric glue stick to adhere a ribbon to the direct middle of the background square. Next, attach a ribbon about 2.75” to one side as well as to the other side of the middle ribbon. Sew these ribbons with matching thread. Keep the stitches very close to the ribbon’s edge.

- Attach the borders. Use the fabric glue stick to adhere border strips to the top and bottom of the block. Sew 1/8” below the pinked edges. Then adhere the side borders. Sew 1/8” below the pinked edges. Finally, baste stitch around the entire square 1/8” from the raw edge.
- Attach the flowers and leaves. Place flower petals(12 per block, 4 petals per flower) and leaves(4per block). Adjust the placement until you are happy with the look. Use the fabric glue stick to adhere the petals and leaves in place. Wait 5 minutes before sewing. Use matching thread colors. Sew all the way around and very close to the edge of each petal and each leaf.
Pot tip: sew slowly to keep the stitches neat and clean.
Repeat steps 1-3 for all 4 blocks.
Pro tip: when the block is complete, turn it over and iron the backside flat.

CREATE A TABLE RUNNER
Sew 3 finished blocks together using a .25” seam allowance. Iron seams open.
Lay the 12.5”X 36.5” backing strip on top of the 3 block strip RST. Sew with a .25” seam allowance around all 4 sides, leaving a 3” turning hole open at one short end. Turn out, work the seams out with your finger or a turning tool, press then sew the turning hole closed. QUILTED OPTION: fuse a 12”x36” piece of fusible fleece to the backing fabric before sewing the block strip on.
EXTRA BLOCK OPTIONS:
Frame the 4th block as wall art to compliment your table runner or finish it as a mini quilt with batting, backing and binding.
The directions for this block can also be used for a paper project!
