Basket With Pockets And Handles

Designer: Daisi Toegel

Instagram: @daisitoegel

Website: www.flowersew.com

------------------------------------------------


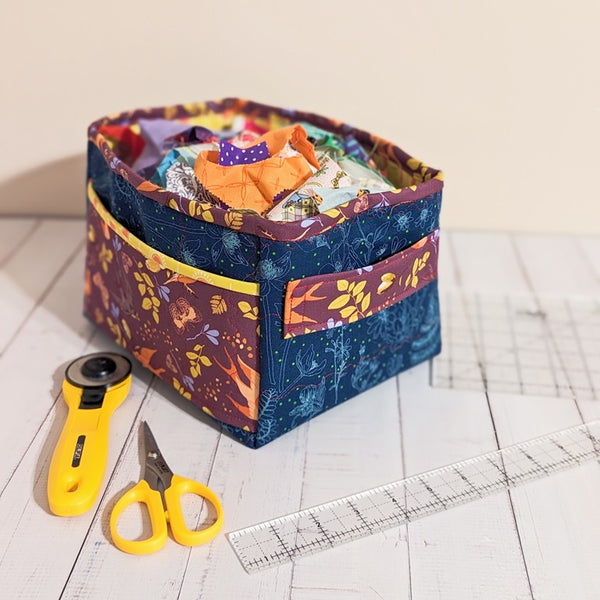
Let’s make a fun basket with pockets and handles to store our sewing goods and scrap fabrics! This basket is an easy project to complete in a few hours, and you can play with color combinations to make many baskets to organize your fabrics and tools in your sewing room.


Let’s get started.


Tools and Supplies Needed:


Cutting Instructions:

*All pieces are cut a bit larger to accommodate quilting shrinkage, and a safe trimming allowance.

**If your stabilizer width is less than 22in, join a strip to enlarge it using zig-zag stitches.


For The Body:

  • Cut from the body external fabric, body lining fabric and stabilizer (1) 24in x 22in piece each. Baste and quilt using the method of your preference. Trim this piece down to 22in x 20in rectangle. (Refer to #1 in the picture above).
  • For the main body binding, cut (1) 2 1/2in x WOF. Fold in half, with wrong sides together, press and set it aside. (Refer to #4 in the picture above)


For The External Pockets:

  • Cut from the body lining fabric, the pockets external fabric and stabilizer (2) 11in x 5in piece. Baste and quilt using the method of your preference. Trim these (2) pieces down to 10in x 4 1/2in rectangles. (Refer to #3 in the picture above)
  • For the pockets binding, cut (2) 2in x 11in. Fold in half, with wrong sides together and set it aside. (Refer to #3 in the picture above)


For The Handles:

  • Cut from the handle’s fabric (2) 6in squares and (2) 1 1/4in x 5in pieces from the stabilizer. (Refer to #2 in the picture above).
  • For the main body inside binding, cut (4) 2 1/2in x 7in. (Refer to #1 in the picture above).


  1. Shape the main body:
    Using the QR-6S 6 1/2" Square Frosted Acrylic Ruler, align the 6in square mark to each of the (4) corners of the main body piece (20in x 22in) and cut out (4) 6in squares (these squares won’t be used).
    A
    Refer to the picture below to check your piece’s measurements.


    2. Prepare the handles and pockets:
      Following the pictures below, first press each handle fabric pieces in half, wrong sides touching. Open and insert one stabilizer piece right besides the center crease, and fold the edges of the fabric towards the center crease – one edge of the fabric will be on top of the stabilizer and the other edge towards the stabilizer - centralize the stabilizer so there will be half inch on each short side with no stabilizer touching these short edges of the fabric (the part that is now folded).
      A
      Fold again, and create a strip that 1 ½ wide and 6in long. Sew each long edge of the strips to finish.


      Bind (1) long edge of each pocket piece and trim any binding excesses.
      Lay each of the handles and pockets on the main body (use the graphic image above on step 1 as reference to the measurements mentioned).
      A
      Each handle will be 1 1/2in below the edge of the 8in side of the main body, and 1in far from the 6in side of the main body’s corners.
      A
      Each pocket when FINISHED will be as in the position shown in the picture below, but FOR NOW just lay each one down, aligning the edge of the pockets to the center of the 6in side of each corner, side to side as shown. Make sure the pockets fit precisely, otherwise trim it to match the extension that it will cover.


      3. Sew the handles and pockets:
        First, position the first handle in place as mentioned in the previous step. Fold 1/4in of each short edge under the handle and sew a 1/2in x 3/4in rectangle on each end of each handle to secure it in place.


        To sew the pocket, first face the lining side up, and align the raw edge of one of the pocket pieces 1/4in above the 10in base side of the main body (in between the 6in corners). If you look two pictures above, simply lay the pocket piece back from what’s showing on that photo.
        A
        Sew using 1/4in seam allowance.


        Fold the pocket back up, the pocket lining fabric will now be touching the main external fabric of the basket body.
        A
        Topstitch the base of the pocket using 1/4in seam allowance, this way the inside raw edge will be covered.


        Sew the sides of the pockets using 1/8in seam allowance.


        Check the photo below to see how the lining side of the main body is looking now. Zoom in if necessary to see the red thread sewn in the picture.


        4. Finish the basket:
          Using wonder clips, clip the four sides of the basket by aligning its corners.


          Sew using 1/4in seam allowance, and bind each corner as you go. Make sure to fold the tip of the binding in when sewing the basket bottom side binding. For the top side trim any binding excess, the top part will be covered with the overall binding on the basket’s edge in the next step.


          Without turning the main side of the bag out yet, start sewing the binding on the main side.
          A
          Push a bit of the bulk of the basket back, and leave a 5in tail of the binding unsewn. Start sewing the binding using 1/4in seam allowance.


          Sew all along the edge of the basket and stop about 5in before it meets the beginning of the binding.
          A
          Join the strips sewing a straight 1/4in line. Finish sewing the binding and trim the threads.


          Clip the binding in place to prepare for stitching in the ditch.
          A
          Stitch in the ditch all along the edge to finish the binding.


          You’re all done! Enjoy your new basket!!